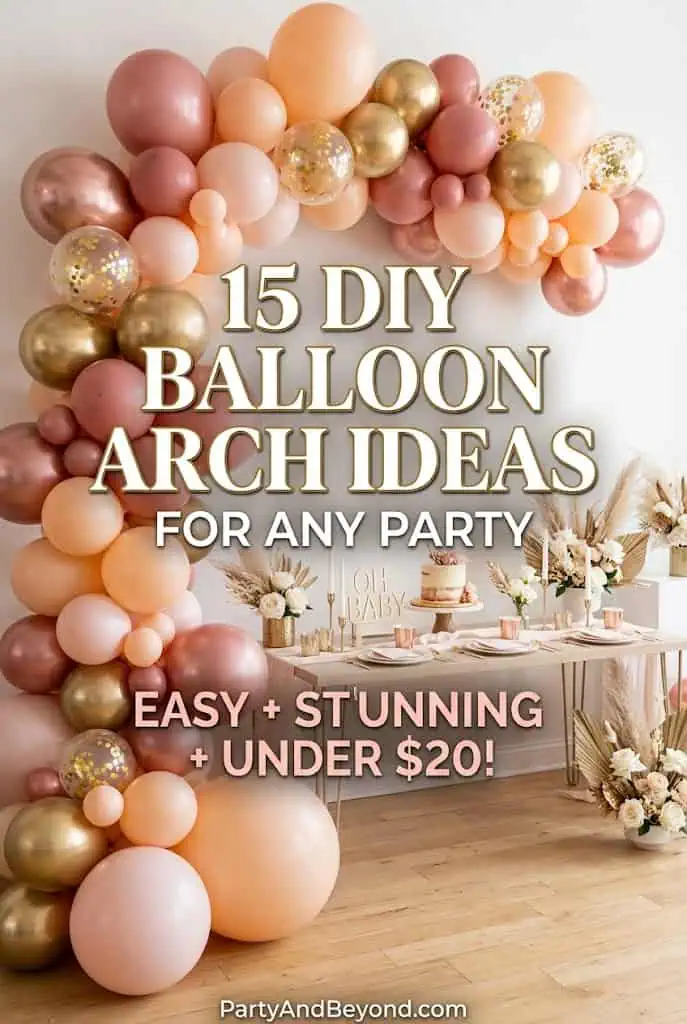
15 DIY Balloon Arch Ideas for Any Party (Easy, Stunning, Under $20)
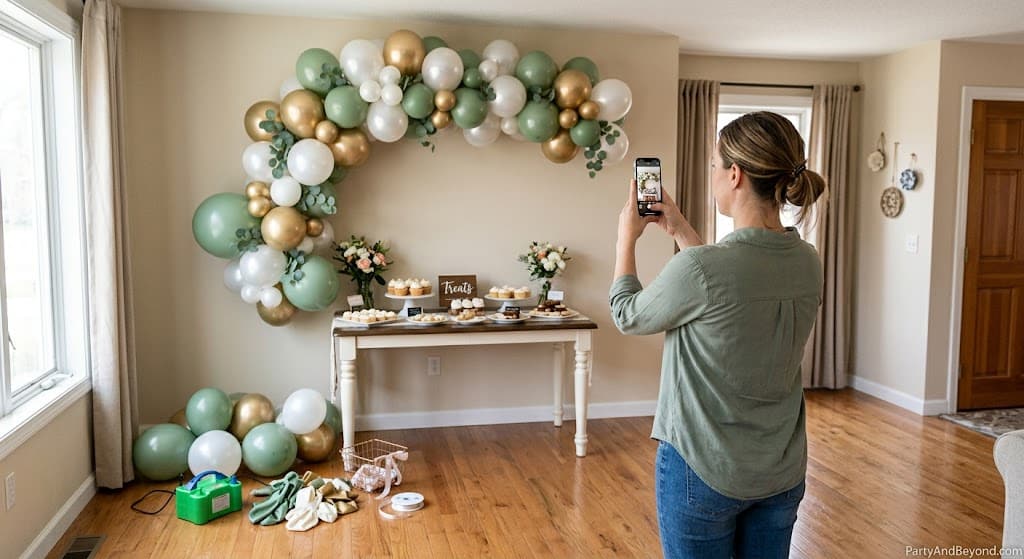
I need to tell you about the moment that turned me into a balloon arch person. Because there was a before and an after, and the dividing line between the two was a baby shower in my living room where my sister built something out of $12 worth of balloons that made every single guest walk through the front door and audibly gasp.
Before that day, I thought balloon arches were one of those things you hired professionals to install — like a chandelier or a tattoo. Something that required specialized equipment, years of experience, and a minimum charge of $200 that made you quietly decide that plain balloons taped to the wall were perfectly fine, thank you very much.
DIY balloon arch ideas
Then I watched my sister spend forty-five minutes in the corner of my living room with a bag of balloons, a plastic strip, a hand pump, and a roll of glue dots — and produce something that looked like it belonged in the window of a high-end event design studio. Pink and gold balloons in three different sizes, flowing in an organic garland over the dessert table, with little sprigs of eucalyptus tucked between them. It was gorgeous. It was the single most photographed thing at the entire party. And when I asked her how much she spent, she said “twelve dollars and about forty-five minutes.”
Twelve dollars. For the decoration that made the party.
Since that day, I have made balloon arches for birthday parties, weddings, graduation celebrations, baby showers, holiday gatherings, gender reveals, bridal showers, and one very enthusiastic “my dog turned one” party that I am not remotely embarrassed about. I have experimented with every color scheme, every shape, every size combination, and every creative variation I could think of. And I have learned that balloon arches are not just one thing — they are a whole category of decoration, with dozens of styles that each create a completely different mood.
This guide covers 15 of my favorite DIY balloon arch ideas — each one designed for a specific party type, each one achievable by a complete beginner, and each one costing under $20 in materials. By the end of this, you will look at every party you attend for the rest of your life and think “I could make a better balloon arch than that.” And you will be right.
Before You Start: The Universal Supplies You Need
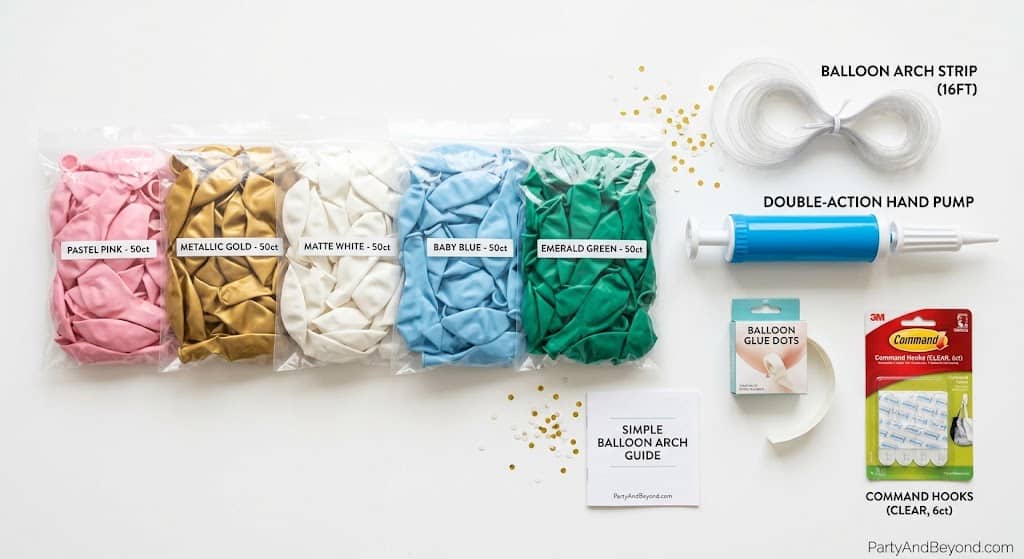
Before diving into the 15 ideas, let me walk you through the supplies that every single balloon arch requires. These are your foundational tools — buy them once and they work for every arch you ever make.
Balloon arch strip ($2 to $3): A long, flexible plastic strip with pre-punched holes that hold inflated balloons in place. This is the skeleton of your arch. Without it, you are tying balloons in clusters the old-fashioned way, which takes three times longer and produces a less organic result. Buy a 16-foot strip — you can always cut it shorter but cannot add length.
Hand balloon pump ($3 to $5): A double-action pump that inflates on both the push and pull stroke. Do not inflate balloons with your mouth. You will hyperventilate by balloon fifteen, your balloons will deflate faster from the moisture in your breath, and your jaw will hurt for two days. The pump pays for itself in saved frustration within the first five minutes.
Balloon glue dots ($2 to $3 for 100): Small adhesive dots that attach mini balloons to larger balloons to fill gaps. These are the secret weapon that transforms a good arch into a professional-looking one. Every gap between balloons gets filled with a 5-inch mini balloon attached with a glue dot, creating the lush, overflowing fullness that makes people say “who did you hire?”
Command hooks ($3 to $5 for a pack): Removable adhesive hooks that mount the arch to walls without damage. Use two to four hooks depending on arch shape and weight. These are essential for renters and anyone who does not want nail holes in their walls.
Total foundational supplies: $10 to $16. You buy these once and reuse them for every arch. The only thing that changes from project to project is the balloons themselves — the colors, the sizes, and the creative elements you add.
1. The Classic Organic Garland (Works for Literally Everything)
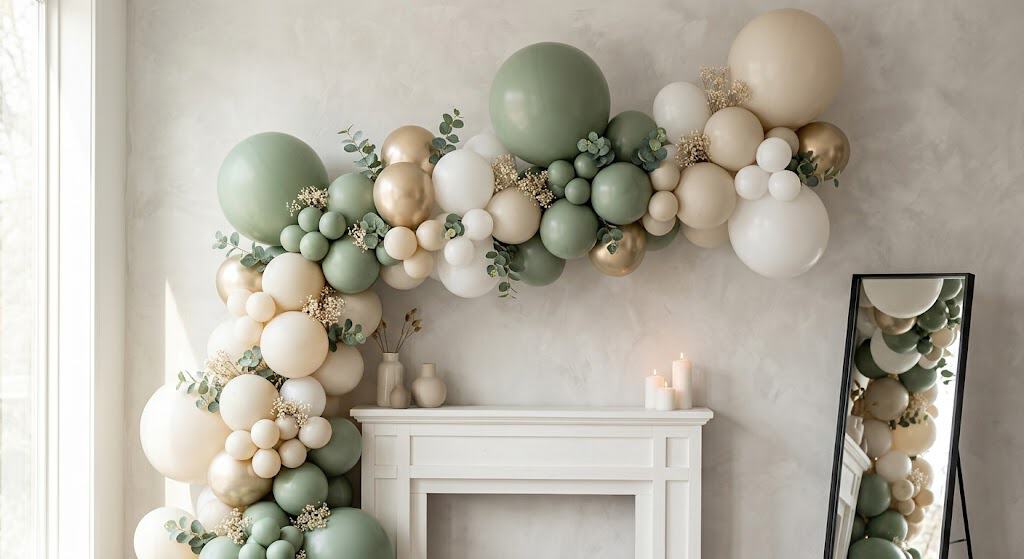
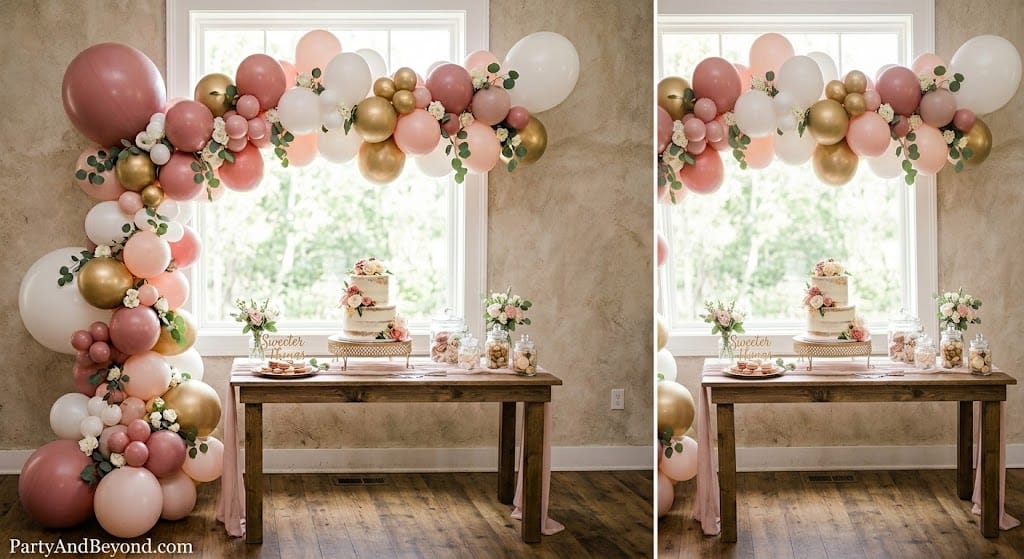
This is your starter arch. Your go-to. The one you will make more than any other because it works for every single occasion — birthdays, showers, holidays, dinner parties, photo backdrops, or a random Tuesday when you want your living room to feel special. The organic garland is a long, flowing line of balloons in multiple sizes that drapes, swoops, and cascades rather than forming a rigid geometric shape. It looks expensive, effortless, and professional every single time.
Choose three to four balloon colors in your party’s palette. For this example, let us use dusty rose, blush pink, white, and gold — a universally beautiful combination that works for everything from bridal showers to first birthdays to Valentine’s Day dinners. Buy 60 to 80 balloons total: about 40 in your dominant color (dusty rose), 20 in your secondary color (blush), 10 in white, and 10 in gold.
Inflate the balloons in three distinctly different sizes. This is the single most important step in creating an organic look — if all your balloons are the same size, the arch looks uniform, flat, and manufactured. If they vary from 5-inch tiny fillers to 12-inch full-size statements, the arch looks organic, dimensional, and expensive. Inflate about 25 percent to full 12-inch size, about 40 percent to medium 8-to-9-inch size, and inflate your 5-inch mini balloons to their natural full size for gap filling later.
Thread the balloons onto the arch strip, alternating colors and sizes randomly. Do not create a pattern — the beauty of an organic garland is its apparent randomness, which actually requires you to actively avoid repeating the same color or size twice in a row. Twist the strip as you thread so balloons point in different directions — up, down, left, right — rather than all sitting on the same side.
Mount the completed garland using command hooks in whatever shape your space allows — a swooping half-arch behind a dessert table, a full arch over a doorway, an S-curve along a wall, or a straight horizontal line across a photo backdrop. Then spend fifteen minutes filling every visible gap with mini balloons attached using glue dots. This gap-filling step is what takes the arch from “I made this” to “who did you hire?”
Total cost: $8 to $14 in balloons (plus reusable supplies) Time: 45 to 60 minutesDifficulty: Beginner
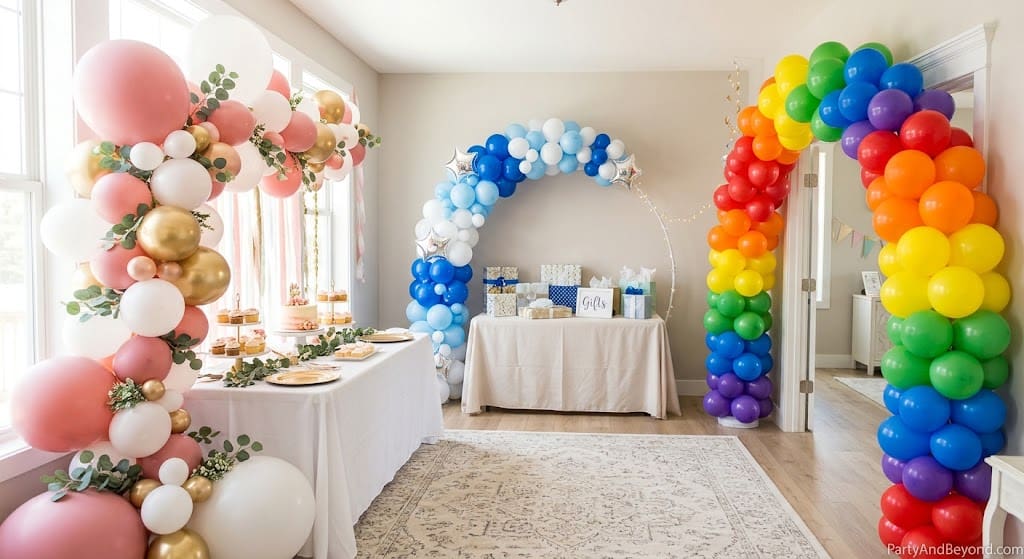
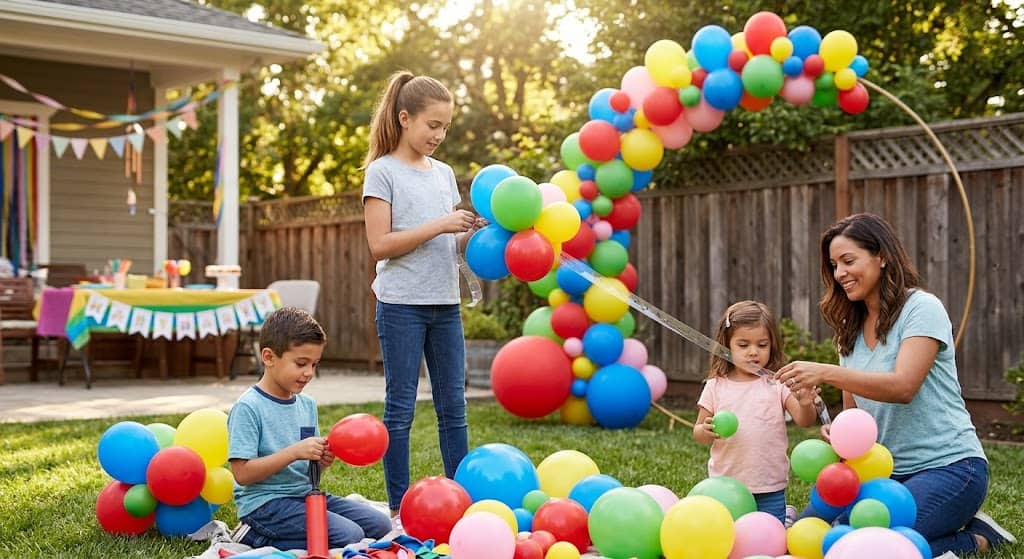
2. The Rainbow Arch (Kids’ Birthday Party Showstopper)
A rainbow balloon arch turns any room into an instant celebration that makes children lose their minds with excitement the moment they walk through the door. Unlike the organic garland where colors are mixed randomly, the rainbow arch arranges colors in the specific order of the rainbow — red, orange, yellow, green, blue, and purple — creating a gradient that flows from one end to the other like a real rainbow stretched across the room.
Buy one bag of balloons in each rainbow color — six colors, approximately ten balloons per color, sixty total. The key to making the rainbow transition look smooth rather than blocky is blending the borders between colors. Where red transitions to orange, mix a few red and orange balloons together rather than creating a hard line. Where orange transitions to yellow, overlap three to four mixed orange-and-yellow balloons in the transition zone. This blending creates a gradient effect that makes the rainbow look continuous and natural rather than segmented.
Mount the rainbow arch as a full semicircle over a doorway, a window, or the birthday cake table. A full rainbow arch requires approximately 12 to 14 feet of arch strip bent into a semicircular shape — use four command hooks to create two anchor points at the top and two guide points along the curve. Add a few gold or silver star-shaped Mylar balloons ($1 each at the dollar store) at the peak of the arch for a magical finishing touch.
For a “clouds and rainbow” variation that kids especially love, place two clusters of white balloons at each base of the arch — inflate ten to fifteen white balloons and pile them at the bottom where the rainbow meets the wall. The white clusters look like clouds supporting the rainbow, and the combined effect is so whimsical and joyful that it becomes the must-photograph backdrop of the entire party.
Total cost: $10 to $16Time: 60 to 75 minutesDifficulty: Intermediate (color ordering requires planning)
3. The Half-Arch (Trendy Asymmetrical Statement)
The half-arch is the most popular balloon arch style on Pinterest and Instagram right now, and for good reason — it creates maximum visual drama with half the balloons and half the effort of a full arch. Instead of spanning a complete semicircle, the half-arch flows from one high point down to one low point, creating an asymmetrical cascade that looks contemporary, editorial, and deliberately artistic.
The half-arch works best behind a focal point — the cake table, the gift table, a photo backdrop, or the guest of honor’s chair. Mount one end of the arch strip high on the wall (seven to eight feet up) using a command hook, and let it cascade down and to one side, ending at table height or even pooling gently onto the floor. The descending flow creates a sense of movement and elegance that a symmetrical arch does not achieve.
For the most impactful half-arch, concentrate your largest balloons at the top (the visual anchor point) and use progressively smaller balloons as the garland descends toward the floor. This size graduation makes the arch look like it is flowing downward naturally — heavy at the top, light and airy at the tail. Add your mini balloons and any accent elements (greenery, metallic balloons, confetti-filled clear balloons) in the middle section for the most visual density.
The half-arch is also the most practical option for small spaces — apartments, small living rooms, narrow hallways — where a full arch would overwhelm the room. It provides all the wow factor of a balloon installation without requiring a large wall or wide doorway.
Total cost: $6 to $10 (fewer balloons needed)Time: 30 to 45 minutesDifficulty: Beginner
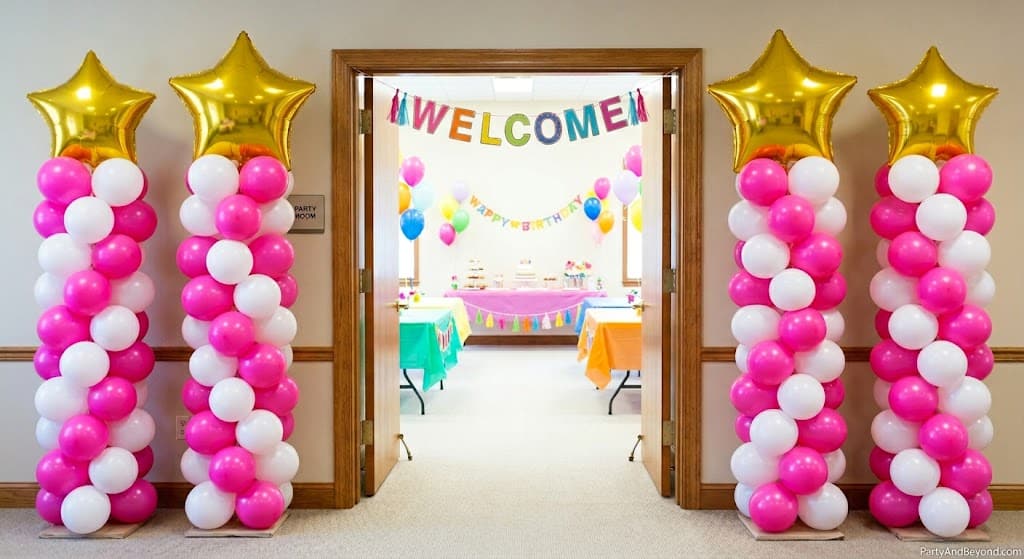
4. The Doorway Frame Arch (Grand Entrance)
Frame an entire doorway with a balloon garland and every guest who walks through it feels like they are entering a celebration rather than just walking into a room. The doorway arch runs up one side of the door frame, across the top, and down the other side — creating a complete balloon border that transforms a standard doorway into a grand entrance.
This arch requires approximately 100 to 120 balloons and 12 to 14 feet of arch strip. Mount the strip using six command hooks — two at the base of each side and two at the top corners — forming an upside-down U shape. Thread and gap-fill using the standard organic technique, concentrating the largest and most statement-making balloons at the top center where the arch crowns.
The doorway arch is particularly effective for the entrance to the party room (so every arriving guest gets the wow moment), for the doorway to a nursery at a baby shower, or as a photo frame that guests stand inside for perfectly framed photographs. Position a camera or phone on a tripod directly facing the arch so every person who walks through gets their “entrance shot” — these photos become the most shared images from the party.
For a variation, add a sheer fabric curtain or a metallic tinsel curtain behind the balloon frame. Guests walk through the curtain into the party, adding a theatrical reveal element to the balloon frame. The combination of balloons framing the door and a curtain providing the transition creates a full sensory entrance experience.
Total cost: $12 to $18Time: 60 to 90 minutesDifficulty: Intermediate
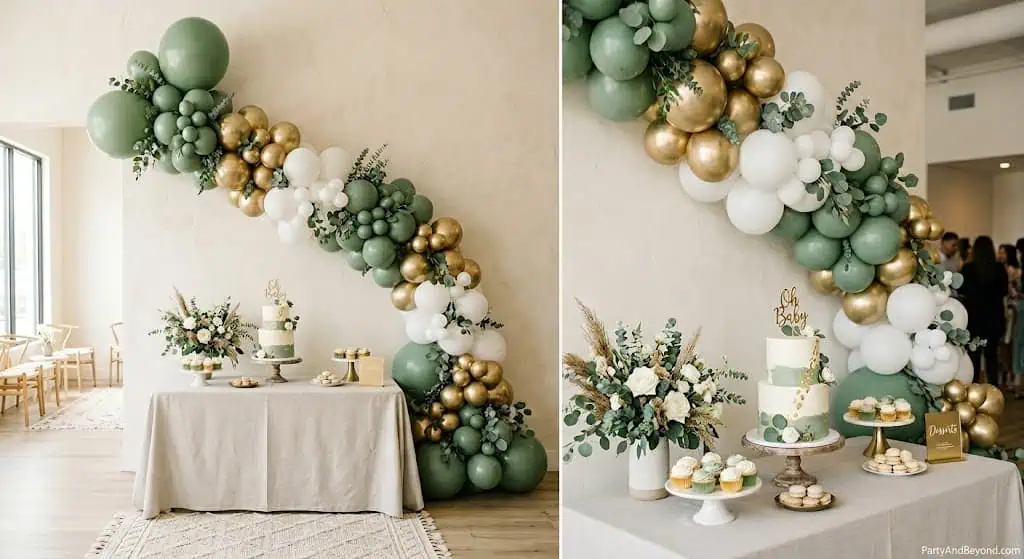
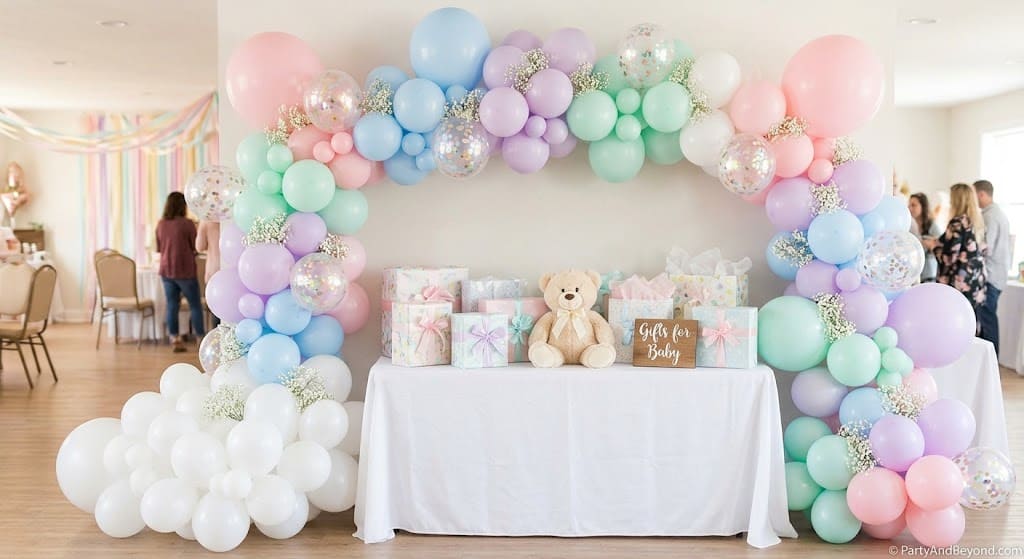
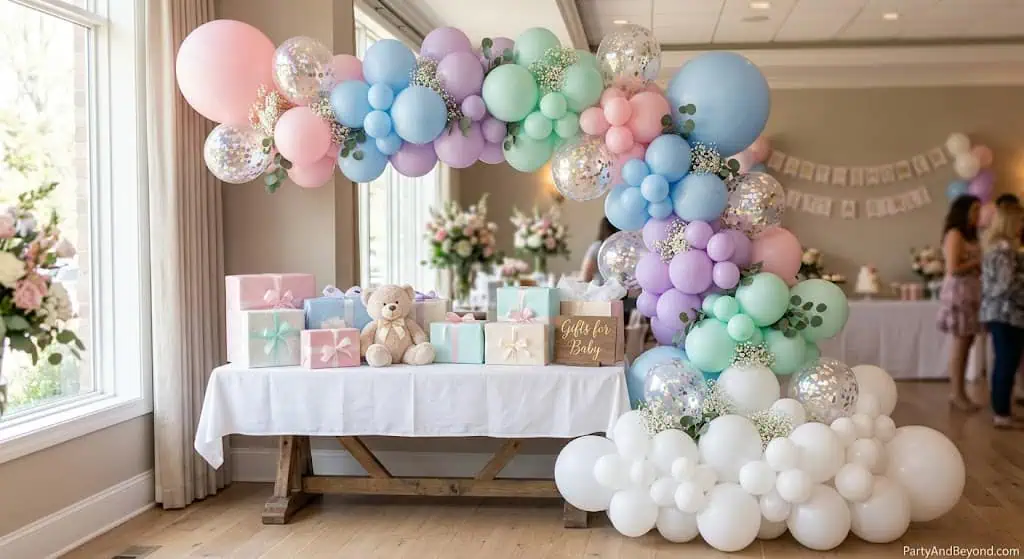
5. The Pastel Baby Shower Arch
Soft pastels — baby pink, baby blue, lilac, mint green, and white — create the quintessential baby shower balloon arch that feels gentle, dreamy, and nursery-appropriate. The color combination works for boy, girl, or gender-neutral celebrations because the mixed pastels avoid committing to a single color while maintaining an undeniably baby-themed softness.
The pastel arch works best as a half-arch or a swooping garland behind the gift-opening area or the dessert table. Add a few clear balloons filled with white or iridescent confetti for sparkle without breaking the soft color palette. Tuck in sprigs of baby’s breath (the flower, not the baby) between balloons for a delicate, romantic texture that enhances the nursery aesthetic.
For a “baby shower on a cloud” effect, create a base of white balloons clustered on the table surface beneath the arch. The white cluster looks like a cloud, and the pastel garland flowing above it looks like a gentle rainbow emerging from the cloud. Place the cake, gifts, or baby-themed decorations on top of and among the white balloon cluster for a complete, cohesive display.
Total cost: $10 to $15Time: 45 to 60 minutesDifficulty: Beginner
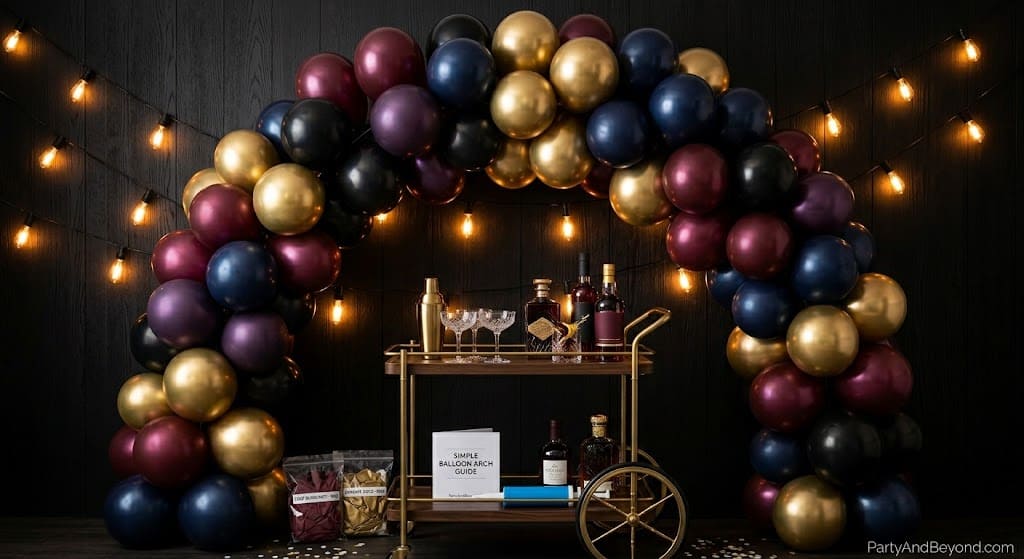
6. The Moody Dark Arch (Elegant Adult Parties)
Not every balloon arch needs to be bright and cheerful. A moody dark arch using deep burgundy, navy, plum, black, and gold creates a sophisticated, dramatic atmosphere perfect for adult birthday parties, New Year’s Eve celebrations, cocktail parties, Halloween events, and any gathering where the vibe is more “candlelit jazz club” than “sunny afternoon birthday.”
The dark color palette requires one additional step: lighting. Dark balloons absorb light rather than reflecting it, which means a moody arch in a dimly lit room looks stunning and atmospheric, but in a brightly lit room it can look flat. Position string lights, candles, or spotlights near the arch so the dark balloons catch light on their curved surfaces, creating dramatic highlights and shadows that bring the colors to life.
Add metallic gold balloons (chrome gold, not standard yellow) as accents throughout the arch — approximately 15 percent of the total balloon count. The gold metallics catch and reflect ambient light, adding shimmer and preventing the arch from looking monochromatic. A few 5-inch black balloons scattered among the deep colors add depth and make the jewel tones pop by contrast.
Total cost: $12 to $18Time: 50 to 65 minutesDifficulty: Beginner (same technique, darker colors)
Mix standard solid-color balloons with clear balloons filled with metallic confetti for an arch that sparkles without adding any external decorations. The confetti inside the clear balloons catches light and shifts as the balloons move, creating a shimmering, dynamic effect that static solid balloons alone cannot achieve.
To fill balloons with confetti, use a small funnel to push metallic confetti (circle or star shapes, available at dollar stores) into uninflated clear balloons before inflating. Insert approximately one tablespoon of confetti per balloon. When inflated, the confetti initially falls to the bottom of the balloon — to distribute it evenly, rub the outside of the balloon with a wool cloth or against your hair to create static electricity, which causes the confetti to cling to the inside surface and spread throughout.
Use confetti balloons as accents — approximately one confetti balloon for every four to five solid-color balloons. Too many confetti balloons create visual chaos; the right ratio adds sparkle without overwhelming the color scheme. Gold confetti in clear balloons works with virtually any solid-color palette. Silver confetti works with cool-toned palettes. Rose gold confetti works with blush and neutral palettes.
Total cost: $10 to $15Time: 60 to 75 minutes (confetti filling adds time)Difficulty: Beginner-Intermediate
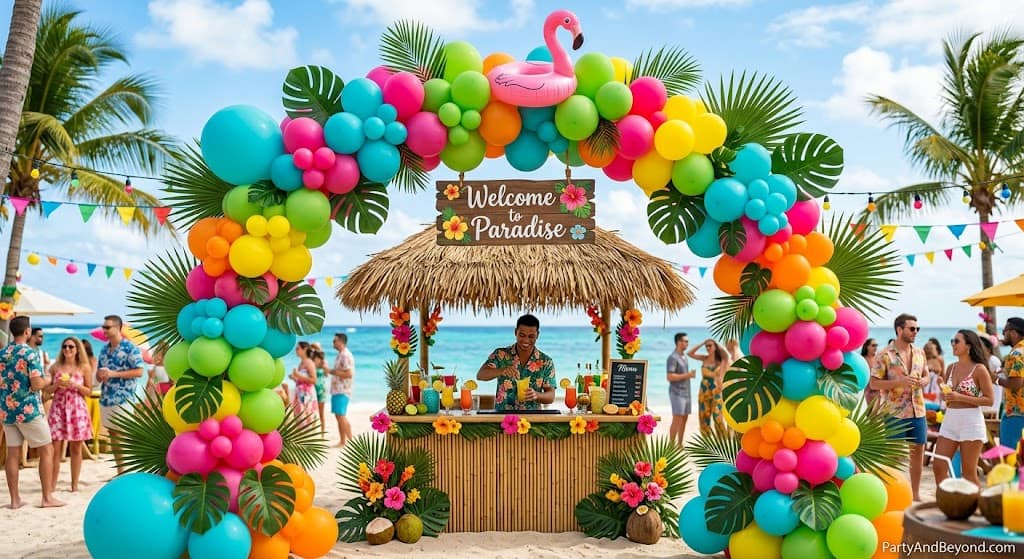
8. The Tropical Luau Arch (Summer Party Vibes)
Transport your party to a Hawaiian beach with a tropical balloon arch in turquoise, hot pink, lime green, yellow, and orange. The saturated tropical colors create an immediately festive, vacation-energy atmosphere that pairs perfectly with pool parties, luau themes, tiki bars, and summer birthday celebrations.
The tropical arch earns its specific identity through what you tuck between the balloons. Add artificial tropical leaves — monstera leaves, palm fronds, and bird-of-paradise leaves ($3 to $5 for a bundle at dollar stores or craft stores) — wedged between balloons using their stems or attached with glue dots. The green tropical foliage against the bright balloon colors creates the unmistakable look of a tropical paradise that no color combination alone can achieve.
For extra tropical flair, add a few small artificial hibiscus flowers or plumeria blooms among the greenery. One or two inflatable flamingos or pineapples ($1 to $2 each) attached at the peak or base of the arch add playful character. A small “Aloha” banner hung from the center of the arch completes the theme.
Total cost: $14 to $20Time: 60 to 75 minutesDifficulty: Beginner
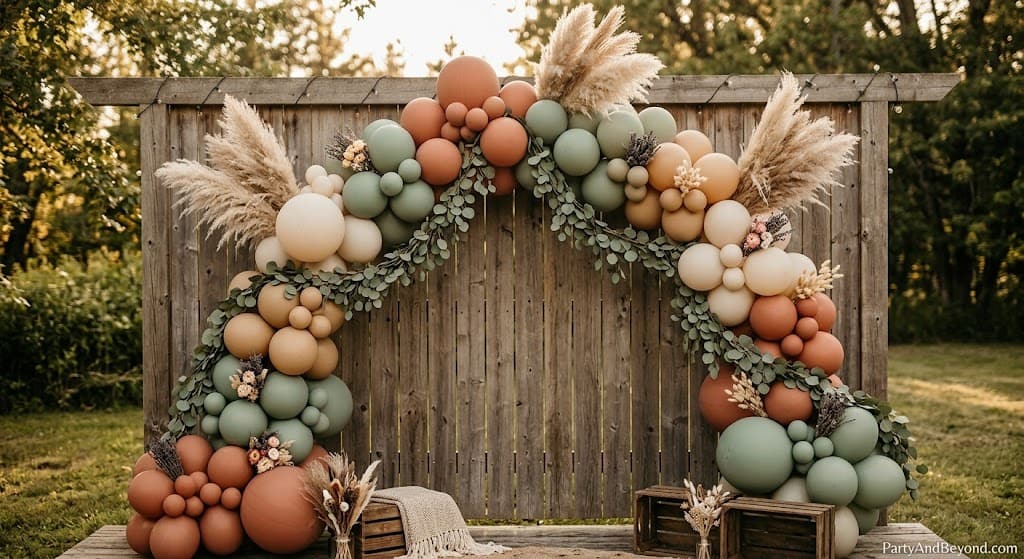
9. The Rustic Boho Arch (Earthy and Organic)
Muted earth tones — terracotta, dusty sage, cream, tan, and muted mustard — create a balloon arch with a completely different personality than the typical bright party arch. The rustic boho arch feels intentionally understated, naturally elegant, and aligned with the earthy, organic aesthetic that has dominated weddings, bridal showers, and Instagram-worthy home decor for the past three years.
The greenery additions are essential for this style — more than any other arch, the boho arch relies on plant material to complete its look. Drape long eucalyptus garlands along the length of the arch, tuck dried pampas grass plumes at the peak and ends, and scatter small dried flower bunches (available at craft stores for $3 to $5) throughout. The combination of muted balloons and natural dried botanicals creates something that looks more like a wedding installation than a party decoration — which is exactly the elevated vibe you are going for.
This arch works beautifully outdoors against natural backgrounds — wooden fences, barn walls, garden settings — where the earth-toned colors harmonize with the natural environment rather than competing with it. It is the preferred arch style for outdoor weddings, engagement parties, and boho-themed bridal showers.
Total cost: $15 to $22 (greenery adds cost)Time: 60 to 90 minutesDifficulty: Intermediate
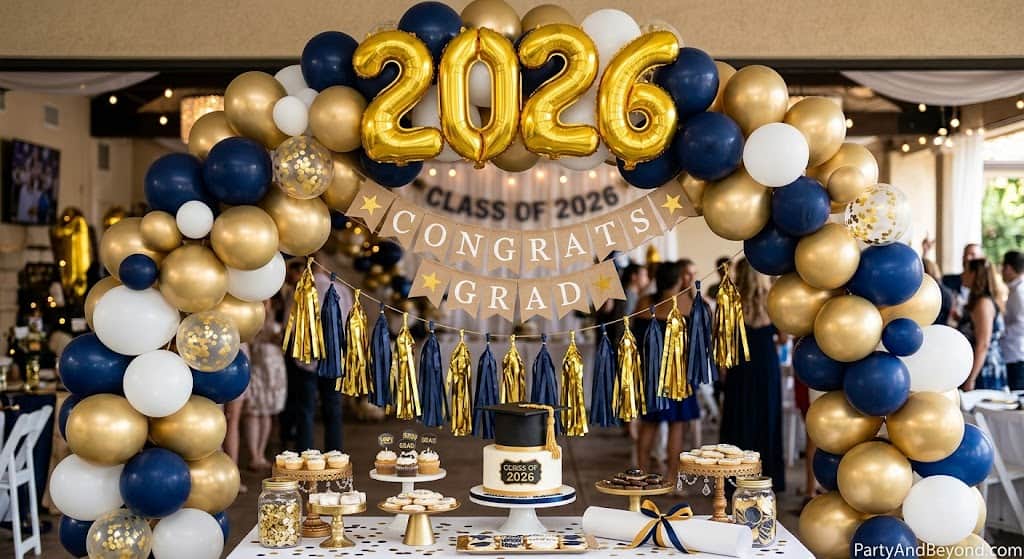
10. The Graduation Arch (School Colors + Metallic)
Use your graduate’s school colors plus metallic gold or silver accents for a balloon arch that celebrates their specific achievement. Navy and gold for one school. Maroon and white for another. Green and silver for a third. Whatever the colors, the addition of metallic accents elevates the arch from “party decoration” to “celebration of accomplishment.”
Add a large metallic number balloon — the graduation year “2026” — at the peak or center of the arch. Attach a small “Congrats Grad” banner hanging from the garland. Tie tissue paper tassels in school colors to the bottom of the arch for movement and texture. These personalized elements transform a standard balloon garland into a specifically graduation-themed display.
Position the arch behind the food table, behind the graduate’s chair, or as a photo backdrop where every guest poses with the graduate beneath the arch. The school-color arch in every photo creates a cohesive visual theme across the entire party’s photo collection.
Total cost: $12 to $18Time: 50 to 65 minutesDifficulty: Beginner
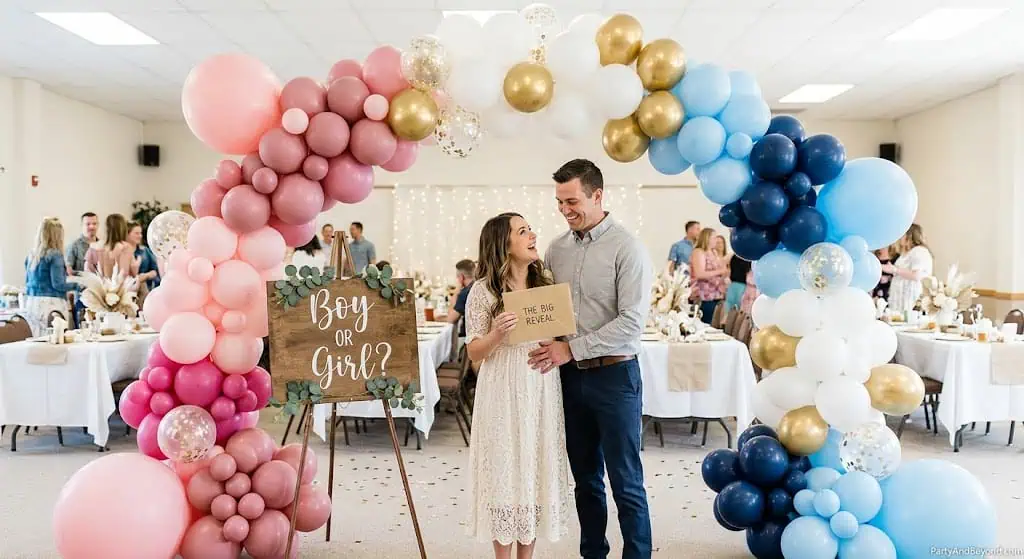
11. The Gender Reveal Arch (Pink AND Blue)
A gender reveal balloon arch uses both pink and blue, sometimes meeting in the middle or blending throughout, creating anticipation and excitement before the big reveal moment. The arch itself does not reveal the gender — it sets the stage for whatever reveal method you have planned (cake cutting, balloon pop, confetti cannon) by surrounding the moment with visual energy.
Build the arch with pink balloons on one side and blue balloons on the other, meeting at the center where the two colors blend together in a mixed zone. Add white and gold balloons throughout as neutral connectors. The visual of pink flowing from one end and blue flowing from the other, merging in the middle, creates a physical representation of “which one will it be?” that builds anticipation.
Position the arch behind where the actual reveal will happen — behind the cake, behind the box that will release colored balloons, or behind the couple who will pop a confetti cannon. When the reveal happens surrounded by the arch, the photos capture both the reaction AND the dramatic balloon backdrop in a single frame.
Total cost: $10 to $16Time: 50 to 65 minutesDifficulty: Beginner
12. The Balloon Column Pair (Framing Entryways)
Instead of a curved arch, create two vertical balloon columns that frame either side of an entrance, a stage, a cake table, or a photo area. Balloon columns are the architectural version of balloon decorations — structured, symmetrical, and professional-looking in a way that organic garlands are not. They add height and formality to any space.
Build each column on a vertical pole — a PVC pipe mounted on a weighted base, a tall dowel rod in a bucket of sand, or a balloon column stand ($8 to $12 for a pair). Thread balloons onto short sections of arch strip and wrap the strip in a spiral around the pole from bottom to top, creating a twisted tower of balloons. Alternate two colors in the spiral — one twist of pink, one twist of white, repeating upward — for a classic candy-stripe column effect.
Top each column with a large 18-to-24-inch balloon or a foil star/number balloon as a finial. The columns should stand five to seven feet tall for maximum visual impact. Position them three to four feet apart framing whatever focal point you want to emphasize.
Total cost: $15 to $22 (including stands)Time: 40 to 55 minutes per columnDifficulty: Intermediate
13. The Tabletop Mini Garland (Small Space Solution)
Not every space can accommodate a wall-mounted arch — and not every party needs one. A tabletop mini garland is a smaller-scale balloon decoration that drapes directly across a table surface, around a cake, along a mantel, or across a window ledge. It brings balloon magic to spaces where a full arch would be impractical, excessive, or physically impossible.
Use 30 to 40 small balloons (9-inch and 5-inch sizes only — no full-size 12-inch balloons) and a 3 to 5 foot section of arch strip. Build the garland using the same organic technique as a full arch, just at a miniature scale. The finished garland sits directly on the table surface, curving around the cake or centerpiece like a balloon frame.
The tabletop garland is perfect for apartment parties where wall space is limited, outdoor parties where wind makes wall-mounted arches risky, and children’s parties where the focus should be at kid-eye-level (table height) rather than adult-eye-level (wall height). It is also the fastest balloon decoration to make — twenty minutes from start to finish — making it ideal for last-minute party prep when time is short.
Total cost: $5 to $8Time: 15 to 25 minutesDifficulty: Beginner (easiest on this list)
14. The Photo Backdrop Arch (Instagram-Ready Wall)
Design a balloon arch specifically as a photo backdrop — flat against a wall, framing a space where guests stand for pictures. Unlike functional arches that decorate tables or doorways, the photo backdrop arch exists for one purpose: creating the perfect frame for every photo taken at the party.
Build an oversized half-arch or swooping garland on a blank wall, leaving a clear center area approximately three to four feet wide and six feet tall — enough room for two to three people to stand comfortably in the frame. The balloons frame the photo subjects the way a picture frame borders a painting. Add a small sign, a letter board, or a banner in the center clear space with the party’s message — “Happy Birthday,” “Baby Shower,” “She Said Yes” — so every photo includes both the balloon frame AND the party’s identity.
Position a ring light or a bright lamp facing the backdrop from the front to eliminate shadows and ensure well-lit photos. Set up a phone on a tripod with a self-timer app, or designate someone with a good phone camera as the photographer for the first hour. The photo backdrop arch generates more social media content than any other single decoration because it creates a designated, designed, beautiful photo opportunity that guests seek out and use repeatedly.
Total cost: $10 to $15Time: 45 to 60 minutesDifficulty: Beginner-Intermediate
15. The Seasonal Holiday Arch (Year-Round Template)
The same organic balloon garland technique transforms into a completely different decoration simply by changing the color palette and accents to match any holiday or season throughout the year. One skill — fifteen holiday variations — endless use.
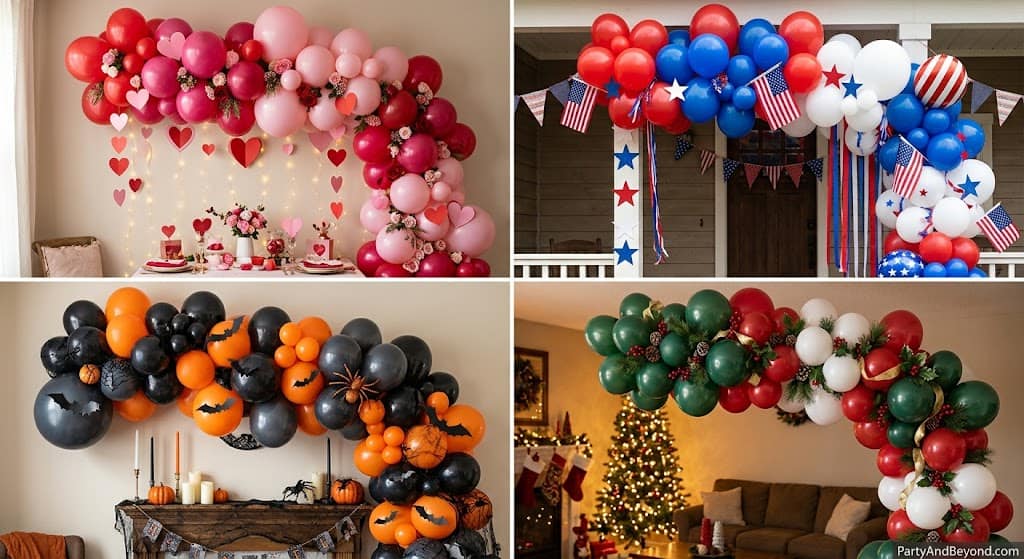
Valentine’s Day: Red, hot pink, white, and clear confetti balloons. Add paper hearts on strings dangling from the bottom of the arch.
St. Patrick’s Day: Emerald green, lime green, white, and gold. Tuck in shamrock picks and gold coin confetti.
Easter: Pastel pink, lavender, baby blue, mint, and yellow. Add small faux flower bunches and a bunny ear balloon.
4th of July: Red, white, blue, and silver. Tuck in small American flags and star-shaped Mylar balloons.
Halloween: Black, orange, purple, and lime green. Add bat cutouts, spider web fabric, and one oversized spider.
Thanksgiving: Burgundy, burnt orange, gold, brown, and cream. Tuck in artificial fall leaves and small pumpkins.
Christmas: Red, green, gold, and white. Add pine sprigs, small ornament balls, and a star at the peak.
New Year’s Eve: Black, gold, silver, and clear with gold confetti. Add metallic tinsel tassels and “2027” number balloons.
The technique never changes. The strip, the pump, the glue dots, the organic sizing — all identical. Only the colors and the accent elements change, which means one afternoon of learning produces a lifetime of decorating capability across every holiday and celebration you will ever host.
Total cost: $8 to $15 per holiday (just balloons + accent items)Time: 45 to 60 minutes per archDifficulty: Beginner (once you have done it once)
Pro Tips That Make Every Arch Better
Always inflate balloons the morning of the event. Latex balloons naturally lose air over 12 to 18 hours. An arch built the night before will look noticeably deflated and saggy by party time. Build it the same day you display it for maximum fullness and impact.
Use odd numbers of accent elements. If you are adding greenery sprigs, flowers, or Mylar balloons, use three, five, or seven — never two, four, or six. Odd numbers create visual asymmetry that the eye reads as natural and organic. Even numbers create symmetry that the eye reads as manufactured and stiff.
Step back every five minutes while building. When you are working close to the arch, you cannot see the overall shape. Every five to ten balloons, take three steps back and look at the arch from the distance your guests will see it. This perspective check prevents you from creating unintentional lumps, thin spots, or color clusters that are invisible up close but obvious from across the room.
Buy 20 percent more balloons than you think you need. Balloons pop during inflation. Balloons pop during threading. Balloons pop when you look at them funny. Having extra prevents a mid-project crisis where you run out of a specific color and the arch looks unfinished. Leftover balloons cost pennies and can be scattered on the floor around the arch for a complete, professional look.
Photograph the arch from the angle your guests will see it. Take a test photo from the entrance of the room or the position where most guests will stand. Adjust any gaps, lumps, or color imbalances that are visible in the photo. If it looks good in a photo, it looks good in person.
Frequently Asked Questions
How many balloons do I need for a balloon arch?
A standard 6-to-8-foot garland requires 60 to 100 balloons including mini fillers. A doorway frame arch uses 100 to 130. A tabletop mini garland uses 30 to 40. Always buy 20 percent more than your estimate to account for popping and last-minute filling. One $5 bag of 50 balloons covers roughly half a standard garland.
How long does a DIY balloon arch last?
Latex balloon arches last 12 to 18 hours indoors without any treatment. Using Hi-Float spray inside balloons before inflating extends the life to 2 to 3 days. Avoid direct sunlight, extreme heat, and sharp objects near the arch. For outdoor arches, build as close to event time as possible and keep the arch in shade.
Can I make a balloon arch without a strip?
Yes, but it takes significantly longer. The traditional method involves tying balloons in pairs, twisting pairs into clusters of four, and connecting clusters with fishing line. This method works but takes two to three times longer and produces a more uniform, less organic result. The strip method is faster, easier, and produces better results for beginners.
What is the cheapest way to make a balloon arch?
Buy all supplies from the dollar store. A bag of 50 balloons is $1.25 at Dollar Tree. An arch strip is $1.25. A hand pump is $1.25. Total: $3.75 for a basic arch using one color. For a three-color organic arch, add two more balloon bags: $6.25 total. This is genuinely the cheapest impactful party decoration that exists.
Do I need helium for a balloon arch?
No. Balloon arches are built with air-inflated balloons attached to a strip, not helium-filled balloons floating upward. The strip provides the structure; the balloons provide the visual. This is why balloon arches are so affordable — helium costs $30 to $50 per tank, while a hand pump costs $3 to $5 and uses free air.
How do I make a balloon arch outside without it blowing away?
Weight the arch at its anchor points. Use sandbags, heavy flower pots, or bricks behind the mounting surface. For freestanding arches, use a weighted frame rather than wall mounting. Avoid building outdoor arches on windy days — even moderate wind distorts the shape and can detach balloons. Build the arch in a protected area: beside a fence, against a house wall, or under a covered patio.
Can kids help make a balloon arch?
Kids ages 6 and up can help inflate balloons with the hand pump and sort balloons by color and size. Kids ages 10 and up can help thread balloons onto the strip. The gap-filling step with glue dots is easy enough for any age with supervision. Making the arch together as a family is both a fun pre-party activity and a way to build anticipation for the celebration.
Twelve Dollars and Forty-Five Minutes
That is what it takes. Twelve dollars in balloons and forty-five minutes of your time to create the single most impactful, most photographed, most talked-about decoration at any party you will ever throw. Not a hundred dollars. Not a hired professional. Not a stressful trip to a party supply store where everything costs four times what it should.
A bag of balloons. A plastic strip. A hand pump. And your two hands.
The first arch you make will be imperfect. The sizes will not be quite right. The gap-filling will miss a few spots. The shape will be a little lopsided. And it will still be gorgeous, because even an imperfect balloon arch is more impressive than no balloon arch, and your guests will not see the imperfections — they will see the effort, the color, the celebration, and the fact that you cared enough to make something beautiful for them.
By the third arch, you will be fast. By the fifth, you will be confident. By the tenth, someone at a party will look at your arch and say the exact words my sister heard at that baby shower years ago — the words that started all of this:
“Who did you hire to do this?”
And you will smile and say: “Nobody. I made it myself.
DIY balloon arch ideas
Every party deserves a moment where someone walks in and says “wow.” A balloon arch gives you that moment for the price of a fast food meal. Pin your favorite idea, grab some balloons, and make your next party the one everyone remembers.
Visit PartyAndBeyond.com for more DIY party decoration ideas that look expensive but cost almost nothing.
Related articles:
DIY 4th of July Decorations That Are Easy and Affordable
Leah Meyer is a passionate event planner and creative writer behind Party & Beyond, where she helps hosts throw stunning celebrations on a real-world budget. From birthday parties and baby showers to backyard weddings and holiday gatherings, Leah personally tests every DIY idea she shares , proving that the wow factor lives in the details, not the price tag. When she's not planning the next party, you'll find her hunting for hidden treasures at dollar stores, inflating balloons (she owns three pumps!), or brainstorming with her dog, the official Chief Inspiration Officer of Party & Beyond.


")
")

