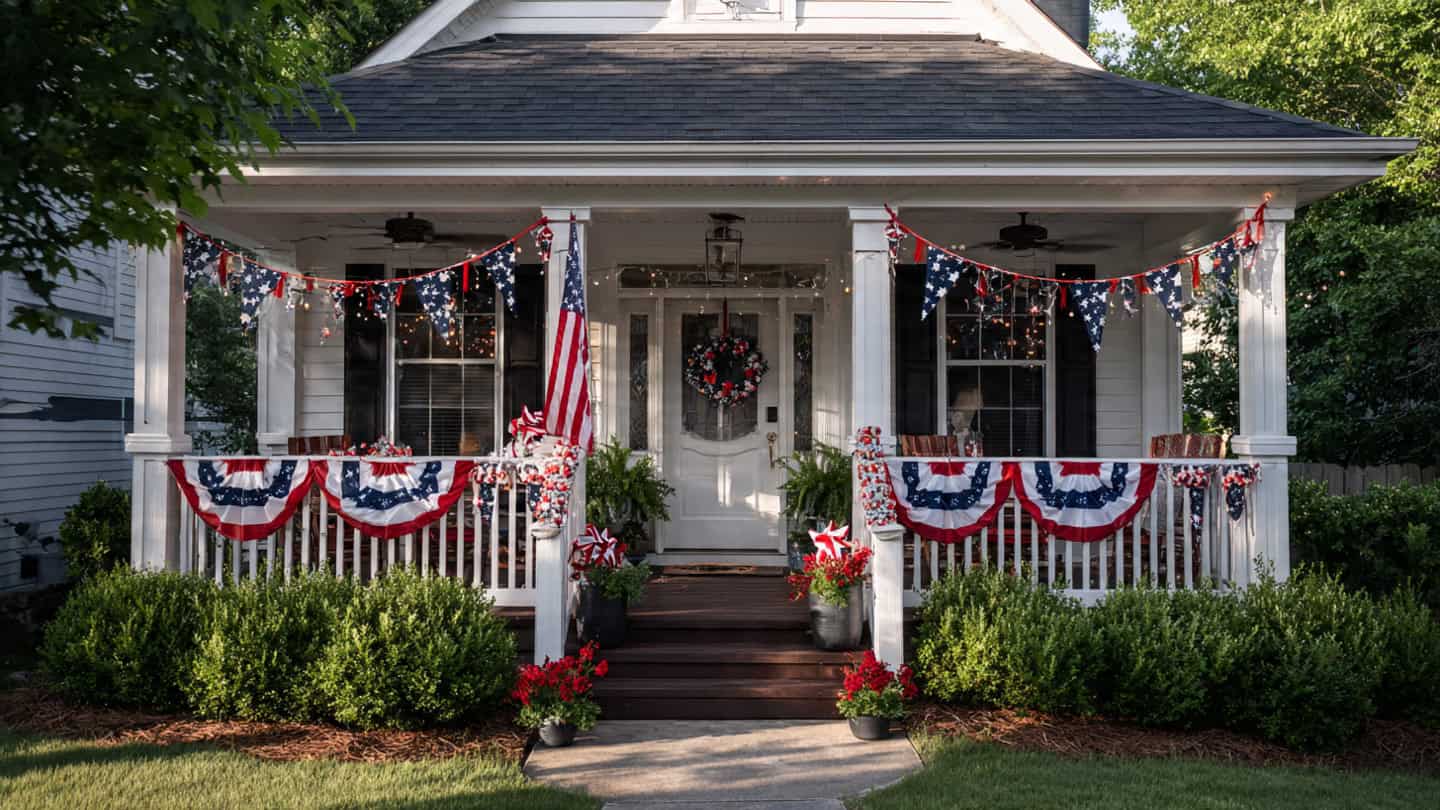
Last Fourth of July, my neighbor Karen — and I say this with all the love and respect that comes from living next to someone for nine years — absolutely destroyed me in the neighborhood decoration game. Her house looked like the American flag and a Pinterest board had a baby. Red, white, and blue bunting draped perfectly across her porch railing. Mason jar luminaries lining the walkway, each one glowing with a flickering candle and painted with stars. A wreath on the front door made from red, white, and blue bandanas twisted into roses. An actual flag garland that she somehow made from book pages and watercolor paint that looked like it belonged in an art gallery.
My house? I had taped a small plastic flag to the mailbox and called it done.
When I walked over to compliment her, fully prepared to hear about the $300 she spent at Pottery Barn, she laughed and handed me a glass of lemonade. “Dollar Tree, my kitchen scissors, and three episodes of a true crime podcast,” she said. “The whole porch cost me $14.”
Fourteen dollars. For a display that made every car driving past our street slow down to look. For decorations that neighbors photographed and posted to their own Instagram stories. For a patriotic transformation that made her porch look like it was styled for a magazine shoot — and all of it was handmade from materials you can find in any dollar store, craft aisle, or kitchen drawer.
That evening, while fireworks were going off overhead and her luminaries were casting a warm glow across both our lawns, I made a decision: next year, I was going to learn how to do what she did. Not just buy decorations — make them. Understand why her dollar-store materials looked expensive while my store-bought flag looked sad. Figure out the difference between “decorated for the 4th” and “celebrating the 4th.”
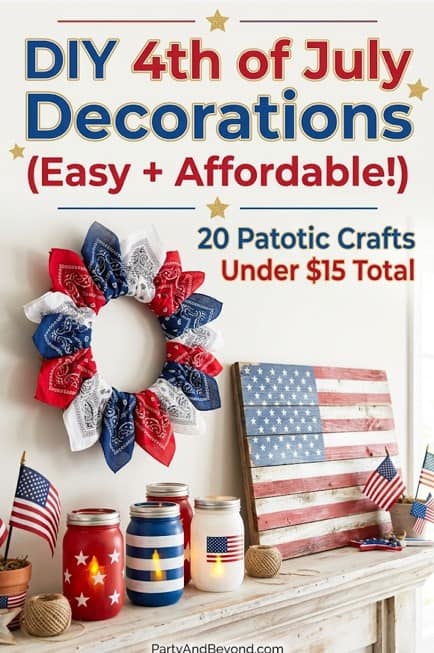
This guide is everything I learned — 20 detailed DIY decoration projects that range from five-minute crafts you can make with a toddler on your lap to afternoon projects that produce gallery-worthy patriotic art. Every single one uses affordable materials, requires no special skills, and produces results that will make your neighbors slow down, stare, and ask you where you bought them.
You didn’t buy them. You made them. And that’s the best part.
Porch and Front Door Decorations
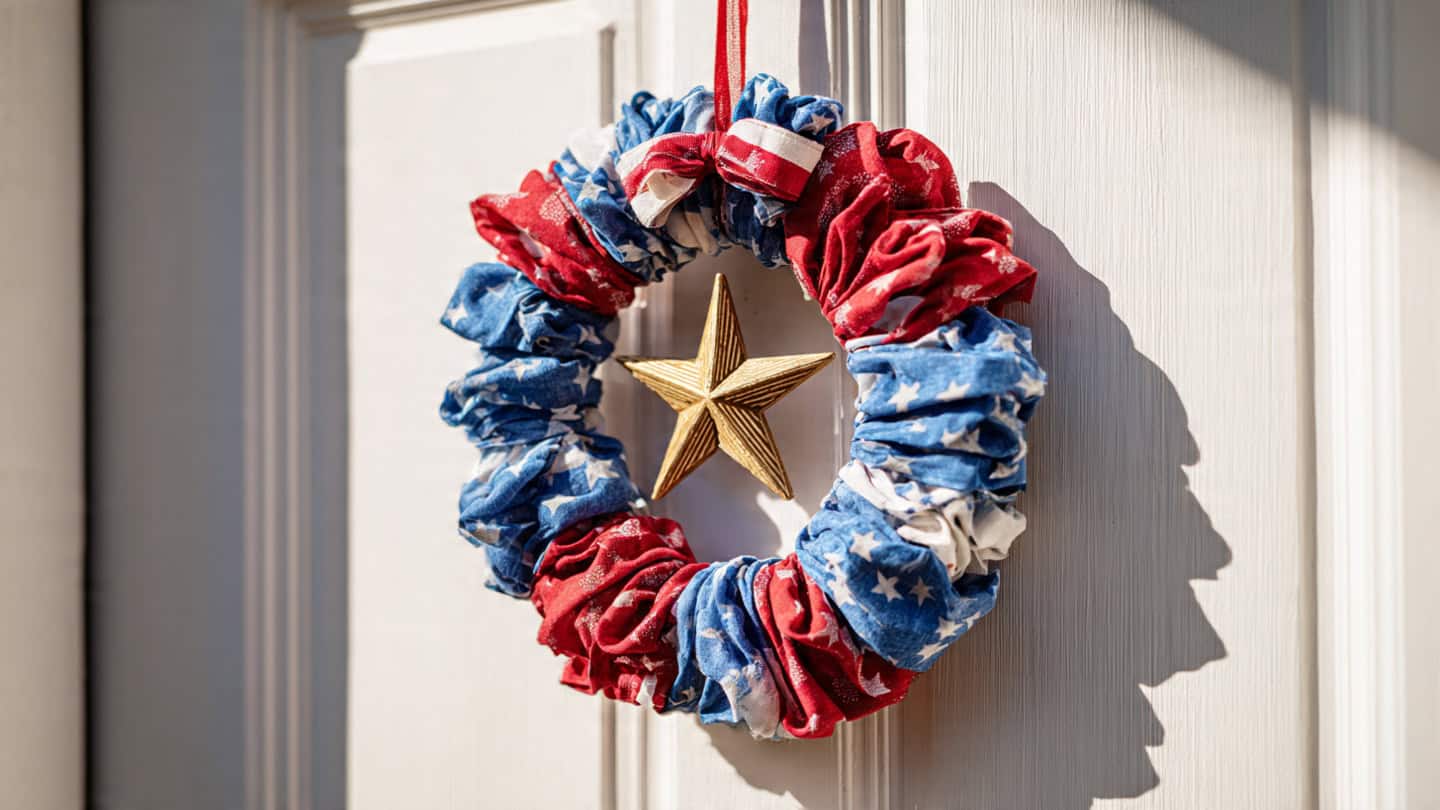
1. Patriotic Bandana Wreath (The $4 Show-Stopper)
This is the decoration that stops people on the sidewalk. A patriotic bandana wreath uses three to four cotton bandanas — one red, one white, one blue, and optionally one with a stars-and-stripes print — gathered, twisted, and hot-glued onto a wire wreath form to create a full, fluffy, textured wreath that looks like it cost $45 at a home decor store. The actual cost is $3 to $5 because bandanas are $1 each at any dollar store and a wire wreath form is $1 to $2.
Cut each bandana into four roughly equal strips, about three inches wide and the full length of the bandana. Take a strip, pinch it in the center to create a gathered, ruffled shape, and hot-glue the pinched center directly onto the wire wreath form. Repeat with the next strip in a different color, working your way around the form and alternating red, white, and blue randomly. Push each strip close to the previous one so the wreath looks full and lush with no gaps. The entire process takes about 25 to 30 minutes, and the result is a textured, dimensional wreath with a rustic, handcrafted charm that manufactured wreaths simply cannot replicate.
The beauty of the bandana wreath is in its imperfection — the slightly uneven gathers, the natural folds of cotton, the way the colors intermingle rather than sitting in perfect stripes. It looks deliberately artisan, like something you would find at a high-end craft fair rather than something assembled on your kitchen table during a Netflix binge. Hang it on your front door with a wreath hanger, or lean it on an easel on the porch for a different display angle. Add a small wooden cutout of a star or the number “4” from the craft store ($1) hot-glued to the center for a finishing touch.
The wreath survives outdoor conditions for two to three weeks without issue — cotton bandanas handle sun and light rain without fading or falling apart. After the Fourth, store it in a gallon zip-lock bag and it comes back out looking exactly the same next year. One project, one afternoon, and five to ten years of use.
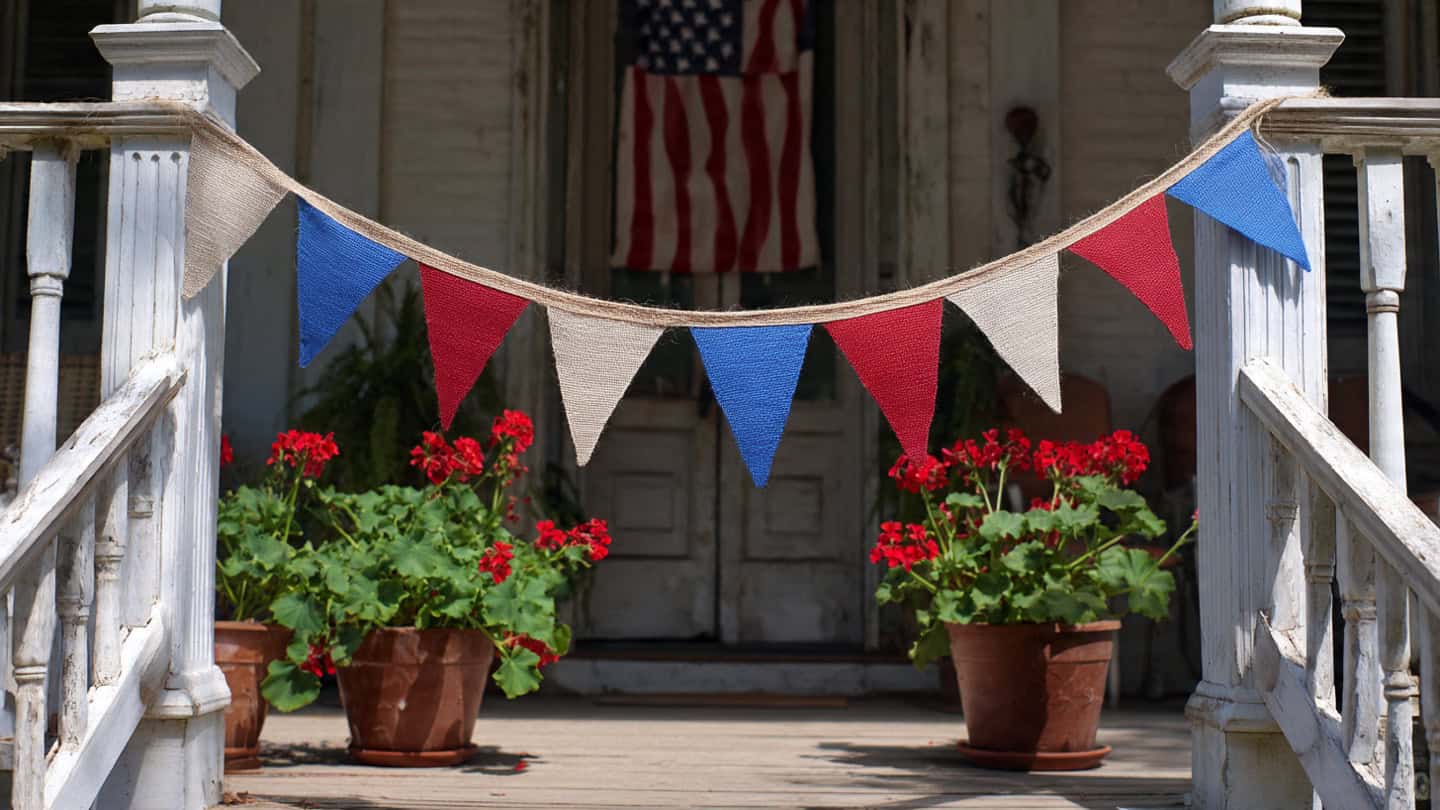
2. DIY Patriotic Bunting From Fabric Scraps
Bunting — those triangular fabric flags hung in a scalloped line across a porch railing, mantel, or doorway — is the single most transformative patriotic decoration because it covers a large visual area with minimal material and effort. A six-foot strand of homemade bunting across your porch railing communicates “this house is celebrating” from fifty feet away, which is exactly the kind of street-level curb appeal that makes a home feel festive.
Cut triangles from red, white, and blue fabric — old shirts, fat quarters from the craft store ($1 each), bandanas cut into triangles, or even thick scrapbook paper if you do not want to work with fabric. Each triangle should be approximately six to eight inches wide at the top and eight to ten inches long at the point. You need 12 to 15 triangles for a six-foot strand.
Lay a length of jute twine, ribbon, or thick string across your work surface. Fold the top inch of each triangle over the string and secure with a line of hot glue, a staple, or a stitch if you sew. Alternate colors — red, white, blue, red, white, blue — spacing the triangles about one inch apart. The finished bunting drapes naturally into the classic scalloped shape when hung from two points.
For a more polished look, use pinking shears to cut the fabric edges into a zigzag pattern that prevents fraying and adds a decorative edge. For a rustic look, tear the fabric instead of cutting — torn edges create a soft, frayed texture that reads as vintage farmhouse. For a modern look, use solid-colored felt sheets ($0.30 each at craft stores) which do not fray, hold their shape perfectly, and come in every shade of red, white, and blue.
Hang the bunting across the porch railing, above a doorway, along the front of a food table at a party, across a mantel, or draped between two trees in the yard. Multiple strands at different heights create a layered effect that fills vertical space and makes the entire area feel like a celebration rather than just a porch with a single decoration.
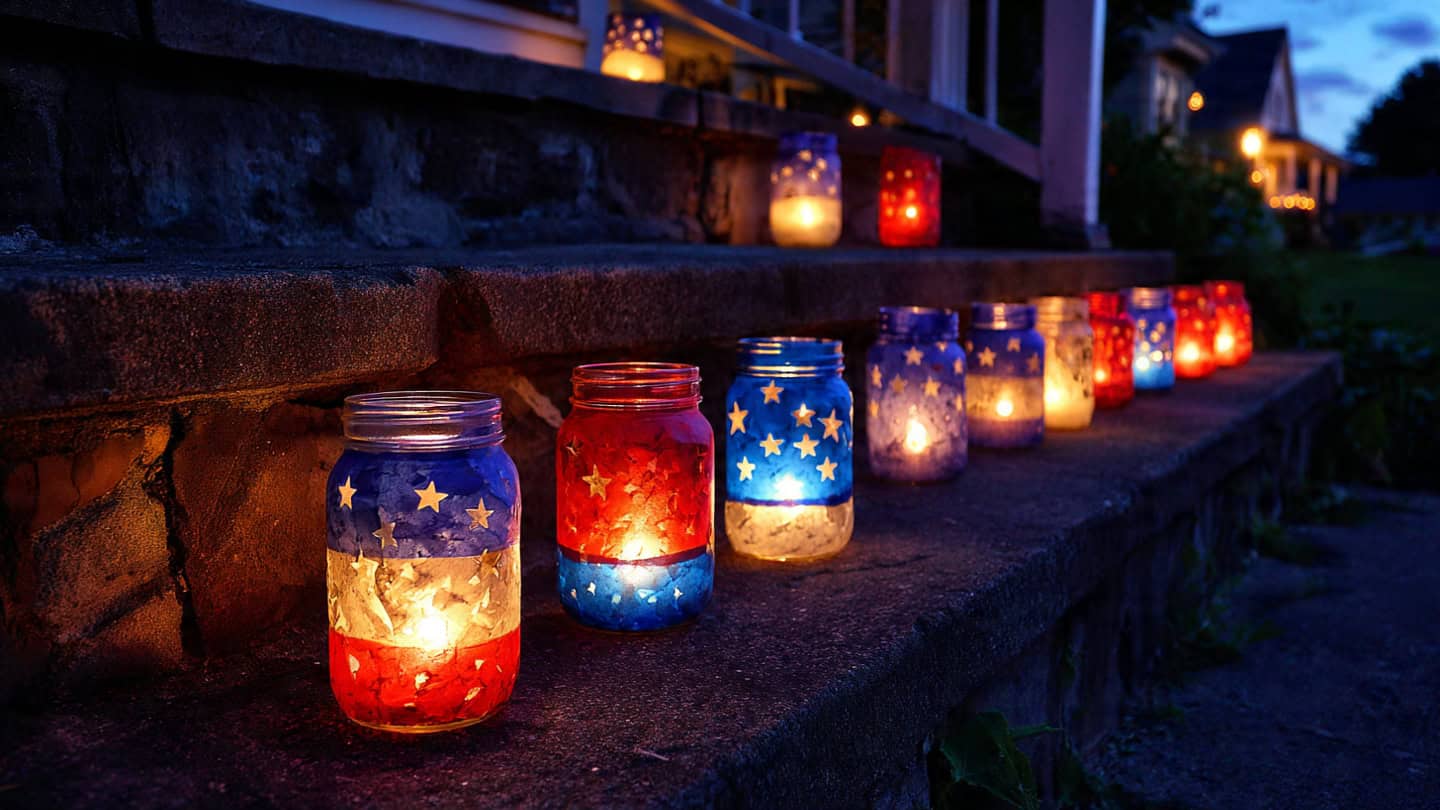
3. Star-Spangled Mason Jar Luminaries
Mason jar luminaries are the decoration that transforms your Fourth of July celebration from daytime festive to evening magical. During the day, they sit as charming painted glass decorations. After dark, they glow with warm candlelight that casts star-shaped shadows and pools of red, white, and blue light across every surface they touch. The transition from daytime charm to nighttime magic is what makes luminaries the most emotionally impactful DIY patriotic decoration you can create.
Start with clean mason jars — pint-sized jars work perfectly, but any clear glass jar (spaghetti sauce jars, pickle jars, even drinking glasses) will produce beautiful results. You need Mod Podge (or watered-down white glue), tissue paper in red, white, and blue, a foam brush, and battery-operated tea light candles (never use real candles in painted jars — the heat can crack the glass or ignite the tissue paper).
Tear the tissue paper into pieces roughly one to two inches square — tearing creates softer, more organic edges than cutting, which produces a stained-glass effect when light passes through. Using the foam brush, paint a thin layer of Mod Podge onto the outside of the jar. Press the tissue paper pieces onto the wet Mod Podge, overlapping them slightly, alternating colors as you work around the jar. Once the entire jar is covered, paint another thin layer of Mod Podge over the top of the tissue paper to seal it. Let it dry completely — about one hour — until the surface is smooth and slightly glossy.
For the star detail, cut small star shapes from white tissue paper (or use star-shaped craft stickers) and apply them on top of the blue tissue paper sections while the final Mod Podge layer is still wet. When the jar dries, the stars appear to float on a blue field — an unmistakable American flag reference that is subtle and beautiful.
Place a battery-operated tea light inside each jar. The light passes through the tissue paper and projects colored light onto the surrounding surface — red glow, white glow, blue glow — while the stars cast tiny shadow patterns. Line five to seven luminaries along your porch steps, down your walkway, across a table centerpiece, or along a fence top. The combined effect of multiple luminaries glowing in the darkness is genuinely breathtaking and creates the kind of summer evening atmosphere that makes guests never want to go inside.
Each luminary costs approximately $0.75 to $1.50 to make (jar free or $1, tissue paper $1 for a multi-pack, tea light $0.25 from a dollar-store multi-pack). A set of seven luminaries costs under $10 total and provides enough visual impact to anchor an entire evening celebration.
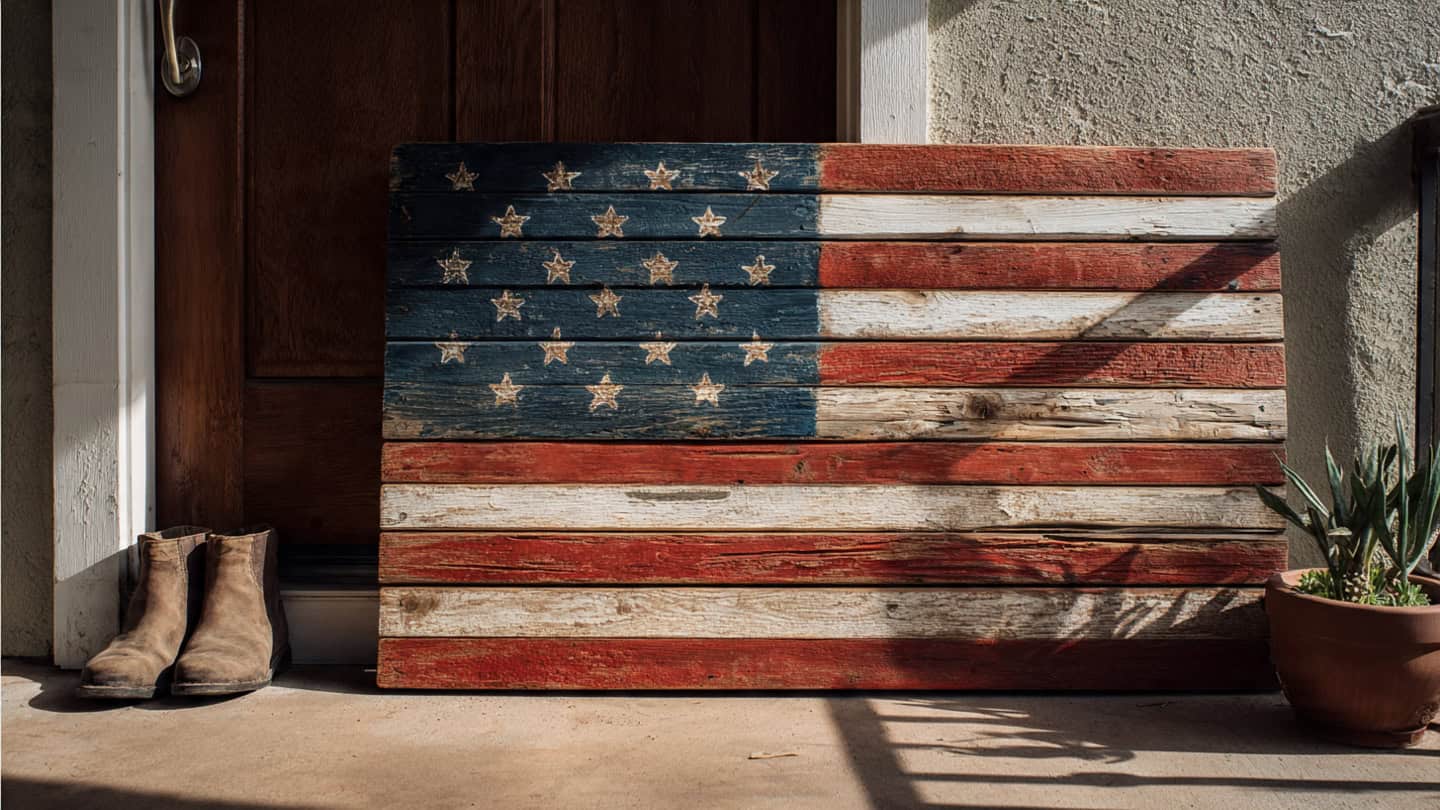
4. Painted American Flag on Reclaimed Wood
A hand-painted American flag on a piece of reclaimed wood or an old fence board is the patriotic decoration that becomes permanent art — a piece you make once and display for decades. Unlike disposable paper decorations that last one season, a wooden flag ages beautifully, developing a weathered patina that makes it look more authentic with each passing Fourth of July.
Find a piece of reclaimed wood — an old pallet board, a section of fence, a wide barn plank, or even a piece of rough-cut lumber from the hardware store ($3 to $5 for a 1×8 board four feet long). Sand the surface lightly to remove splinters but keep the natural wood grain and imperfections visible. These imperfections are the charm — they make the flag look vintage and storied rather than factory-printed.
Paint the flag directly onto the wood surface using acrylic craft paint ($1 per bottle at any craft store or dollar store). Start with the blue canton (upper left rectangle) — paint it a deep navy blue, about one-third the height and one-quarter the width of the board. Add white stars using a small star stencil ($1 at a craft store), a pencil eraser dipped in white paint for dots, or freehand small stars if you are comfortable. Paint alternating red and white horizontal stripes across the rest of the board — seven red stripes and six white stripes, though nobody will count so approximate stripes work perfectly.
The secret to making this look professional rather than kindergarten-craft is intentional distressing. After the paint dries completely, lightly sand the surface with fine sandpaper, focusing on the edges, corners, and natural wood grain areas. The sanding removes small amounts of paint, allowing the wood grain to show through the colors, which creates that coveted “vintage flag found in a barn” aesthetic. Do not over-sand — subtle distressing looks intentional while heavy sanding looks like a mistake.
Seal the finished flag with a coat of matte polyurethane spray ($5) to protect the paint from weather and UV damage. Hang it on the porch, lean it against the house beside the front door, mount it above a mantel, or prop it on an easel at a Fourth of July party. The flag weighs only a few pounds and can be stored flat in a closet or garage between seasons.
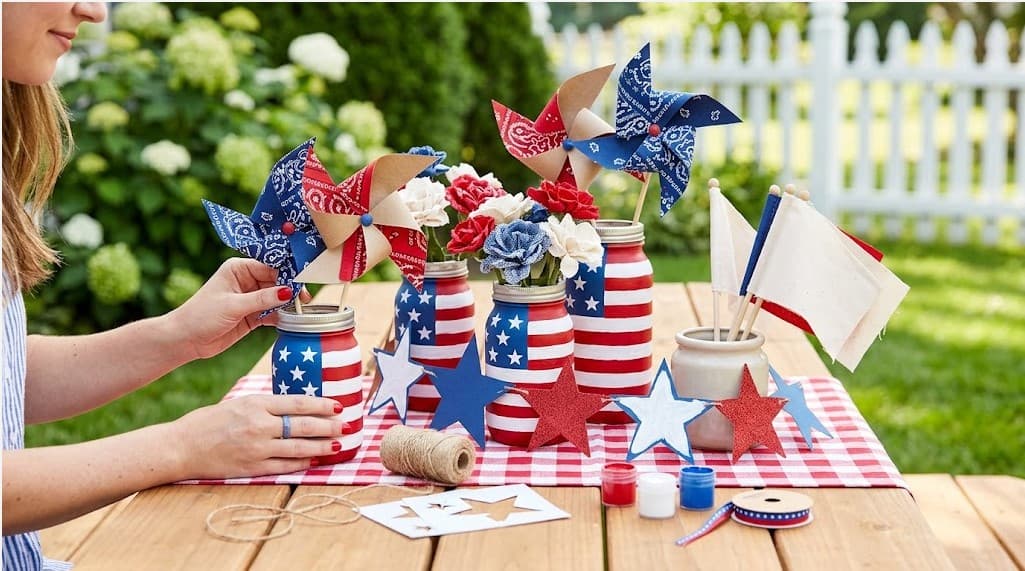
5. Red White and Blue Centerpiece Jars
Create a stunning patriotic centerpiece using three mason jars (or any matching glass containers) painted in solid red, solid white, and solid blue. Fill each jar with fresh or faux flowers — white daisies in the red jar, red carnations in the white jar, blue hydrangeas or blue-dyed baby’s breath in the blue jar. Group the three jars together in the center of a table with a small American flag pick inserted into the middle jar.
The painting technique is simple: pour a small amount of acrylic paint into each jar, rotate the jar to coat the interior surface evenly, pour out the excess, and let the jar dry upside down on a newspaper for 24 hours. The paint coats the inside of the glass, creating a smooth, glossy, opaque surface on the outside that looks like colored glass rather than painted glass. This interior-painting method also means the painted surface is protected by the glass itself — it will not chip, scratch, or wear off from handling.
The total cost for this centerpiece is approximately $3 to $6 — jars ($0 if you reuse food jars, or $1 each), paint ($1 per bottle), and flowers (grocery store bouquets for $5, or faux flowers from the dollar store for $1 to $2). The visual impact is disproportionately large — three coordinated colored jars with flowers create a focal point that anchors an entire table and photographs beautifully for social media.
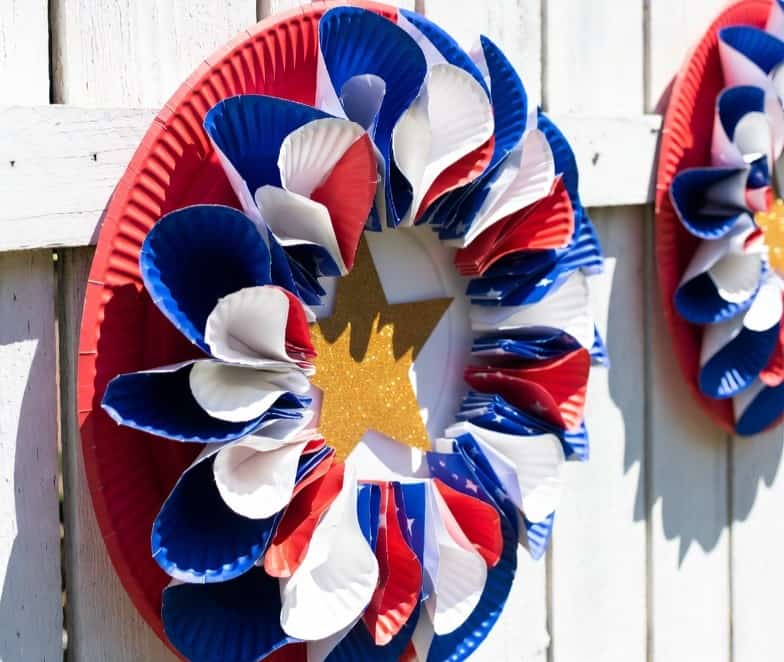
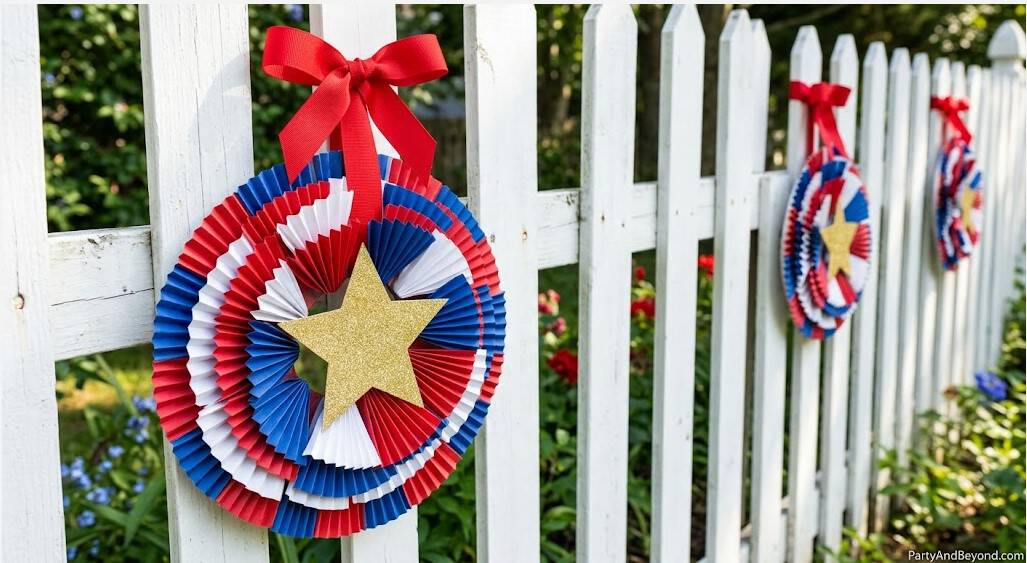
6. Star-Spangled Paper Plate Wreath
This is the five-minute craft that produces a decoration so charming that people refuse to believe it started as a stack of paper plates. Take a large paper plate and cut out the flat center, leaving only the raised rim — this becomes your wreath form. Take six to eight small paper plates (dessert size) and fold each one in half, then in half again, creating a quarter-circle fan shape. Hot-glue these folded fans around the rim of the large plate, alternating between red, white, and blue paper plates. The overlapping fans create a rosette effect that looks like a ruffled fabric wreath.
Finish with a star cutout from silver or gold cardstock glued to the center, and a ribbon loop on the back for hanging. The entire project takes five to seven minutes per wreath, costs less than $2 in materials, and produces a decoration that kids and adults both love making. Create three and hang them in a vertical line on the front door, or place them at intervals along a fence for a repeating patriotic motif.
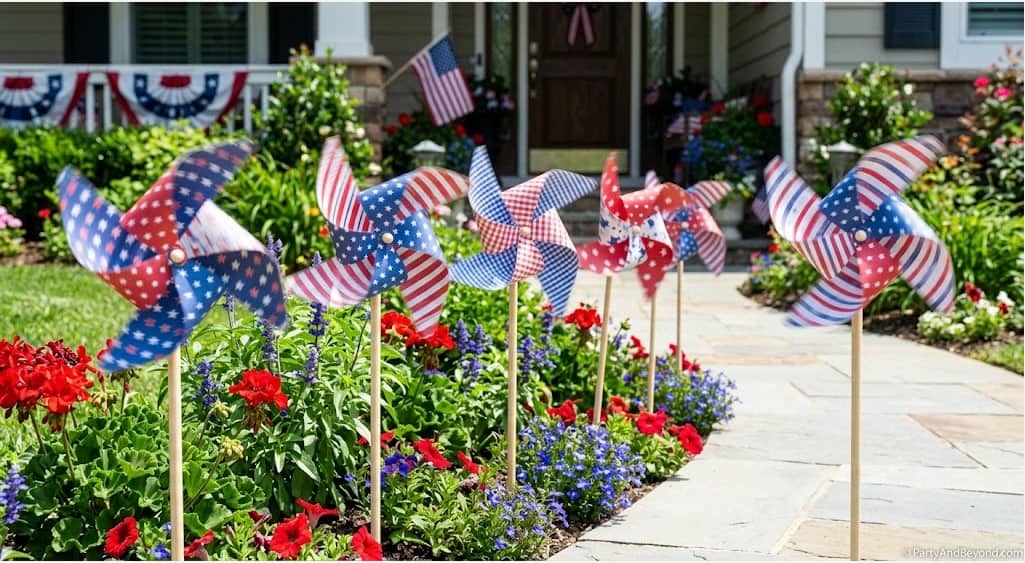
7. Patriotic Pinwheel Garden Stakes
Patriotic pinwheels spinning in the breeze add movement and whimsy to any outdoor Fourth of July display — and movement is the element that most static decorations lack. A row of red, white, and blue pinwheels in a planter box, along a walkway, or clustered in a garden bed catches the eye from a distance because the spinning motion draws attention even from peripheral vision.
Make pinwheels from square sheets of scrapbook paper or cardstock in patriotic patterns — stars, stripes, gingham, solid colors. Cut from each corner toward the center, stopping about one inch from the middle. Fold every other corner tip to the center point and secure with a brad (paper fastener) pushed through all the overlapping tips and the center of the paper. Push the brad through a small bead (as a spacer to allow free spinning) and then through the eraser end of a pencil, a wooden dowel, or a thin bamboo garden stake. Splay the brad legs flat against the back of the stick to secure.
Each pinwheel takes about three minutes to make. Create ten to twelve and push them into the soil of a flower bed, a planter, or the grass along a walkway. The visual of a dozen red, white, and blue pinwheels spinning simultaneously in a summer breeze is genuinely delightful — it adds the energy of a carnival to your front yard and creates a patriotic display that is unique, handmade, and constantly in motion.
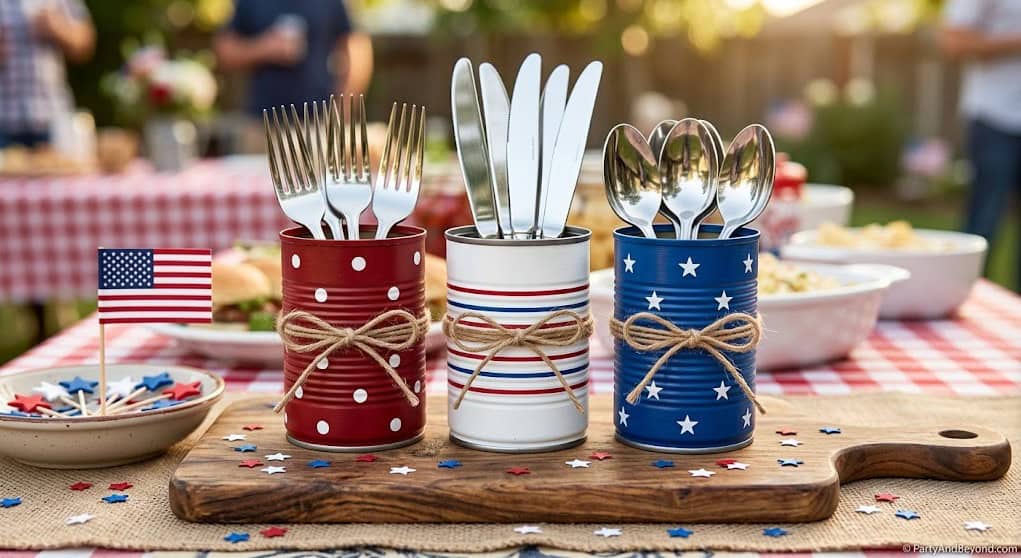
8. Tin Can Utensil Holders (Painted Patriotic)
Transform empty tin cans into patriotic utensil holders, pencil cups, or small vases by painting them in red, white, and blue and displaying them as a set. Clean three large tin cans (28-ounce tomato cans work perfectly), remove the labels, and file any sharp edges on the open end smooth. Paint the exterior of each can with acrylic paint — one red, one white, one blue — applying two coats for full opacity. Let dry completely.
Add details with a contrasting color: white stars stenciled on the blue can, white polka dots on the red can (use a pencil eraser dipped in white paint), and thin blue and red stripes on the white can using painter’s tape as a guide. Seal with a coat of clear acrylic spray to protect the paint from water and handling.
Fill the finished cans with silverware (forks in one, knives in another, spoons in the third) at a Fourth of July buffet, or fill them with small flags, sparklers (unlit, for display only), or lollipops in patriotic colors. Group the three cans together tied with a jute twine bow for a farmhouse-style presentation. Each can costs $0 (you were going to throw it away) plus $0.50 in paint, making this a nearly free craft that produces surprisingly professional-looking results.
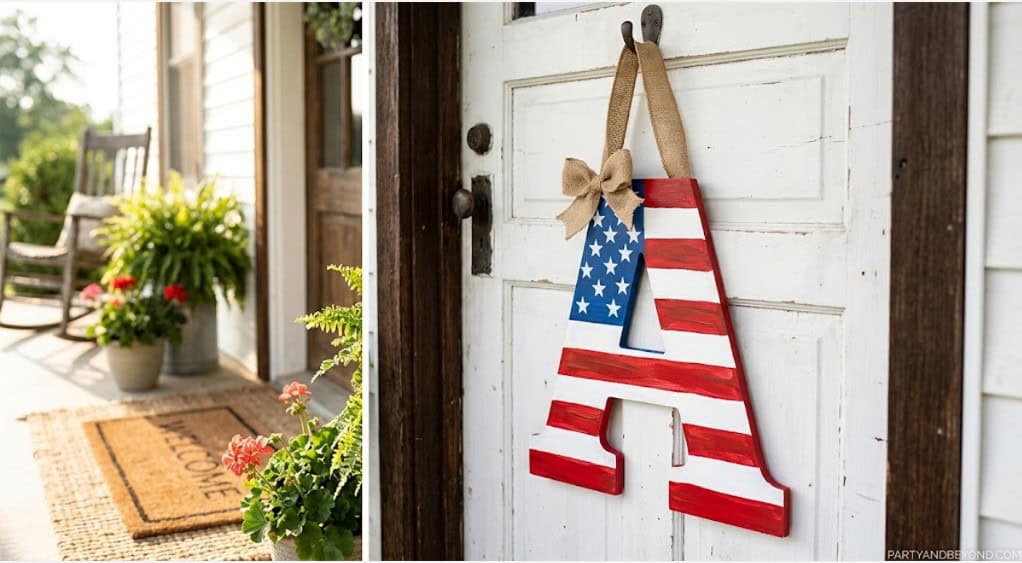
9. DIY Patriotic Door Hanger (Stars and Stripes Letter)
Cut a large letter from half-inch thick wood, foam board, or thick cardboard — the letter “U,” “S,” “A,” or your house number works perfectly. Paint the letter in horizontal red and white stripes, then paint or glue a blue section in the upper left corner with white stars, replicating the American flag pattern directly on the letter shape. Attach a ribbon loop to the back and hang it on your front door, gate, or porch wall.
For a simpler version, buy a pre-cut wooden letter from the craft store ($2 to $4) and paint it entirely in blue, then hot-glue a pattern of small white star buttons or star stickers across the surface. The three-dimensional texture of buttons on a painted surface creates a tactile, interesting decoration that looks boutique-made.
The total cost is $2 to $5 depending on the material, and the project takes 30 to 45 minutes including drying time. The finished letter is lightweight, easy to hang, and visible from the street — making it one of the most effective front-door decorations per dollar spent.
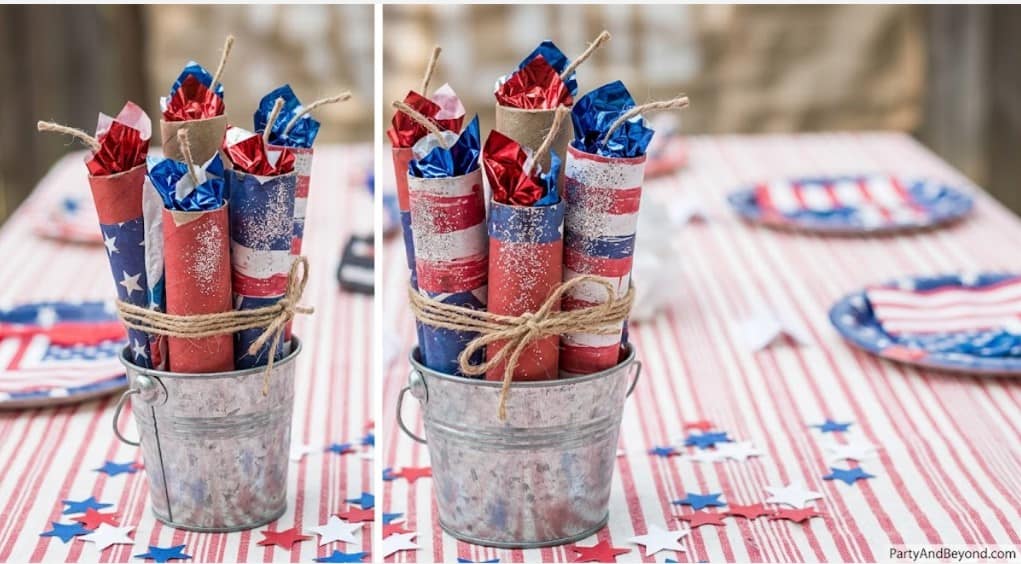
10. Firecracker Toilet Paper Roll Craft (Kids’ Favorite)
This is the craft that keeps kids happily occupied for 30 minutes and produces a decoration they are genuinely proud to display. Wrap empty toilet paper rolls in red, white, or blue construction paper or tissue paper, securing with glue or tape. Twist one end closed and stuff a few pieces of tissue paper or metallic streamers out the open end to look like a “fuse.” Glue a short piece of string or yarn to the tissue paper fuse for a realistic wick effect.
Each “firecracker” takes about three minutes to make. Create a dozen in assorted sizes (paper towel rolls for large firecrackers, toilet paper rolls for medium, cut-down rolls for small) and bundle them together with a rubber band, then wrap the bundle with a piece of jute twine tied in a bow. The finished bundle looks like a cluster of vintage firecrackers and makes an adorable table centerpiece, mantel decoration, or front porch accent.
For added sparkle, brush the finished firecrackers with a thin layer of Mod Podge and sprinkle with fine glitter before the glue dries. Silver and gold glitter on red, white, and blue paper creates a sparkly, celebratory effect that catches light beautifully. Display the firecracker bundle standing upright in a small bucket, basket, or tin can filled with shredded paper for support.
Yard and Outdoor Decorations
11. Red White and Blue Balloon Garland
A balloon garland in patriotic colors creates the same dramatic, professional impact as a balloon garland for any other party — but in red, white, and blue, it becomes specifically and unmistakably Fourth of July. Mount it over the food table at your barbecue, above the front door, across the garage, or behind a photo spot in the yard. The visual statement is massive, the cost is minimal ($8 to $15 in balloons), and the construction technique is the same straightforward strip-and-thread method covered in any balloon arch tutorial.
Buy bags of balloons in red, white, blue, and optionally silver or clear with silver confetti inside for sparkle accents. Inflate in three sizes — large, medium, and small — for the organic look. Thread onto a balloon arch strip alternating colors randomly. Mount with command hooks. Fill gaps with 5-inch mini balloons using glue dots. Tuck in a few small star-shaped Mylar balloons ($1 each at dollar stores) for metallic accents that catch sunlight.
The whole project takes 45 to 60 minutes and creates a decoration that dominates the visual landscape of your party. Every photo taken near the balloon garland looks immediately festive and professionally styled. The garland survives 12 to 18 hours of outdoor display in mild weather — build it the morning of your Fourth of July celebration for maximum impact.
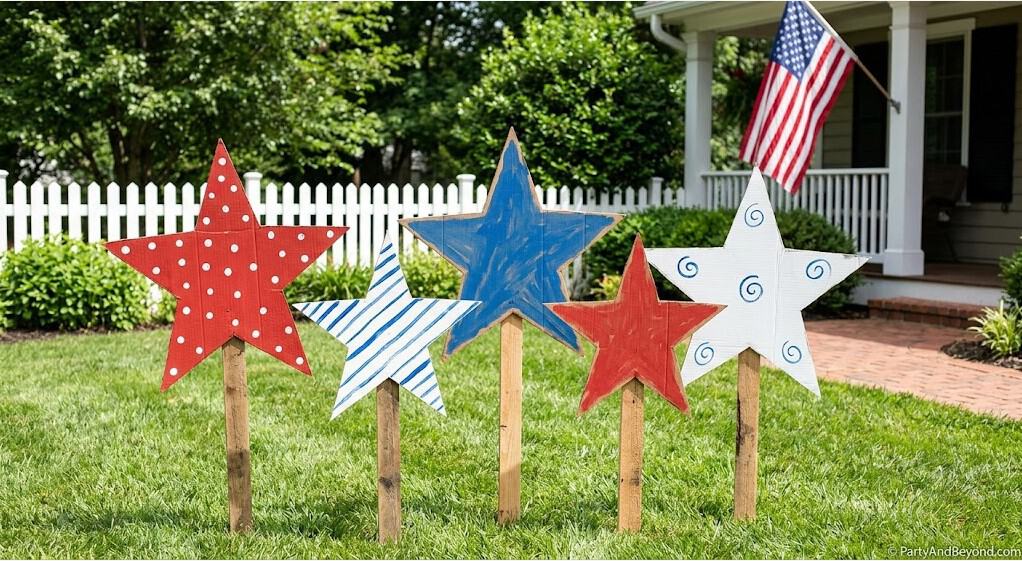
12. Star-Shaped Lawn Ornaments From Cardboard
Cut large five-pointed star shapes (18 to 24 inches across) from heavy cardboard — shipping boxes provide perfect material for free. Paint each star in solid red, solid white, or solid blue with acrylic paint or spray paint. Apply two coats for full coverage and let dry completely. Attach each painted star to a wooden garden stake or a long dowel rod with hot glue or duct tape on the back.
Push the stakes into the lawn, garden beds, or planter boxes at various heights and angles. Five to seven stars in a cluster creates a three-dimensional patriotic installation that is visible from the street and adds a folk-art quality to your yard that store-bought decorations cannot achieve. The intentional imperfection of hand-cut, hand-painted cardboard stars is their charm — they look like Americana folk art, not mass-produced plastic.
For added durability and weatherproofing, spray the finished stars with a coat of clear polyurethane before mounting outdoors. This sealant prevents the cardboard from softening in humidity and the paint from running in light rain. Even with the sealant, these are best treated as one-season decorations — but since the materials are free cardboard and $2 in paint, making a fresh set each year takes 30 minutes and costs essentially nothing.
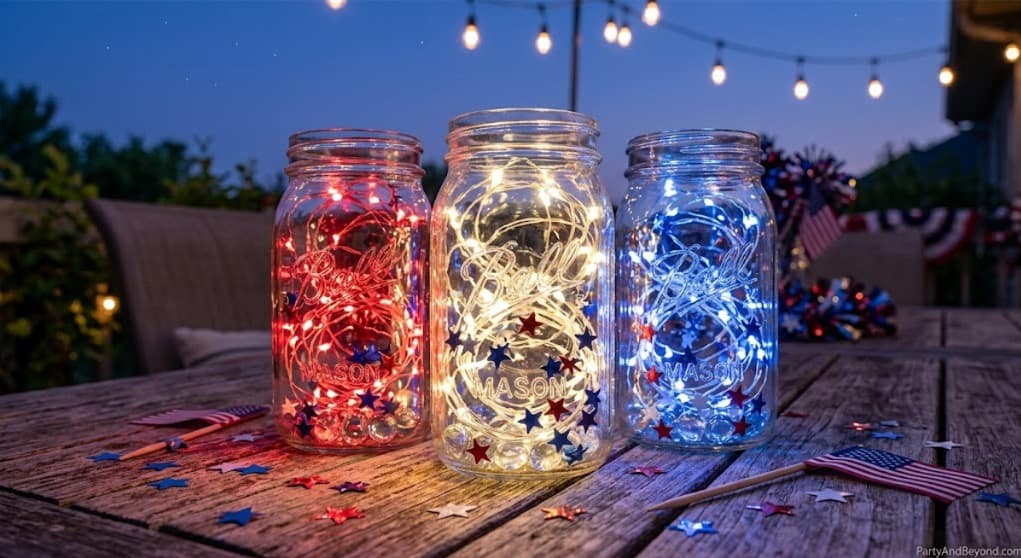
Wrap short strands of red, white, and blue battery-operated fairy lights around the inside of large mason jars or glass vases. The lights coiled against the glass create glowing orbs of patriotic color that look spectacular clustered on a table, lined along a walkway, or hung from shepherd’s hooks in the yard. Unlike traditional string lights that hang in lines, these light jars create concentrated pools of color that feel intimate and decorative rather than utilitarian.
Use three jars — one with red fairy lights, one with white, one with blue — and group them as a set. The three-color grouping is visually stronger than scattering individual jars because the concentrated colors create a deliberate, designed display. Add a handful of star-shaped confetti, glass beads, or small ornaments inside each jar to add sparkle and dimension when the lights reflect off the additional surfaces.
Battery-operated fairy light strands ($1 to $2 each at dollar stores) run for 40 to 60 hours on a fresh set of batteries, which means they last through the entire Fourth of July weekend without changing batteries. Turn them on at dusk and let them glow all evening — the warm, sparkly light creates an atmosphere that turns any backyard barbecue into an enchanted patriotic celebration.
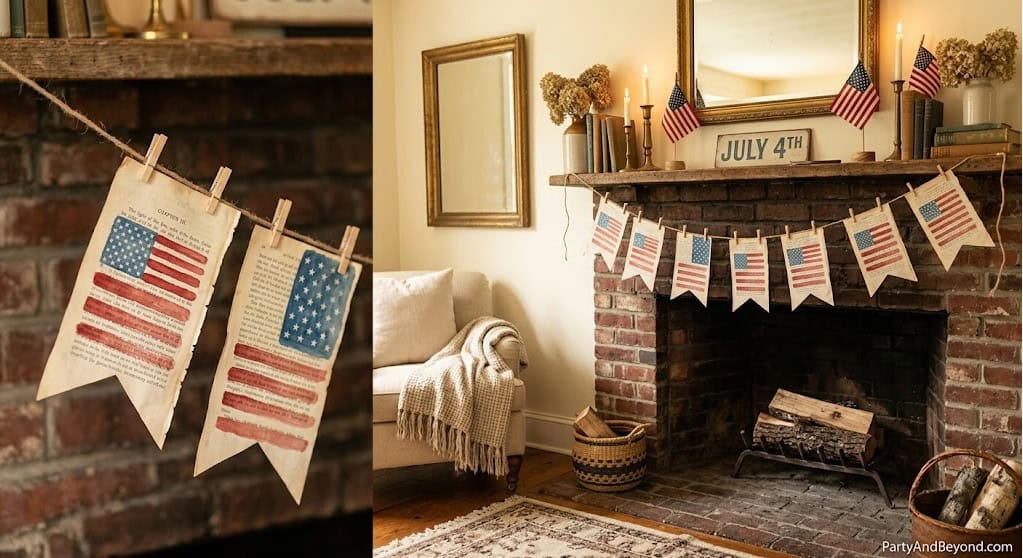
14. DIY Flag Banner From Book Pages (Vintage Style)
This is the decoration that elevates your Fourth of July aesthetic from “festive” to “Pinterest-featured.” Take old book pages (from a damaged book, a thrift store find, or printed vintage-style pages from a free online template), cut them into pennant shapes, and paint an American flag motif onto each pennant using watered-down red and blue acrylic paint. The translucent watercolor effect over the printed text creates a layered, vintage, literary look that is genuinely beautiful and entirely unique.
String the painted pennants on jute twine, spacing them two inches apart, and hang the banner across a mantel, above a doorway, along a fence, or between two porch columns. The contrast of aged paper, printed text visible beneath the paint, and the hand-painted flag motif produces a decoration that looks like it was created by an artist rather than a crafter. People who see this banner always ask where you bought it — and the answer (“I painted it on old book pages”) consistently produces genuine surprise.
The total cost is less than $2 if you use a discarded book, or $0 if you print faux vintage text on regular paper and tea-stain it (soak in brewed tea for 20 minutes, dry flat) before painting. The project takes about one hour for a six-foot banner and produces a one-of-a-kind decoration that becomes a family heirloom — something you pull out every year and eventually teach your kids to make.
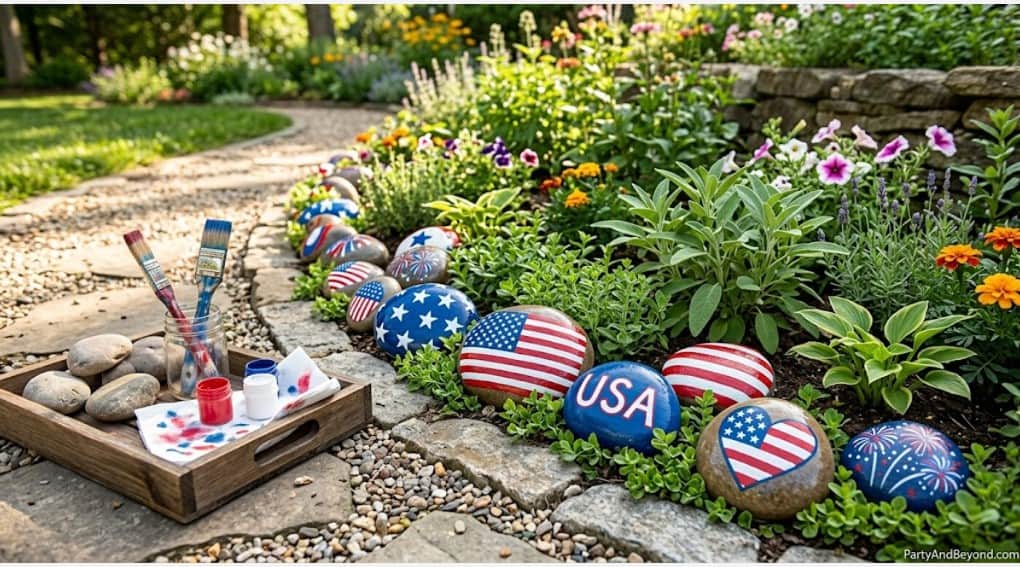
15. Patriotic Rock Painting (Garden Accents)
Collect smooth river rocks from a garden center ($3 to $5 for a bag) or from a local creek or beach. Paint them in patriotic designs — solid red, white, and blue with star or stripe accents, miniature American flags, the word “USA” or “FREEDOM” in white paint on blue rocks, red-and-white striped rocks, or simple star shapes in white on blue backgrounds. Use acrylic paint pens ($5 to $8 for a set) for clean lines and detailed designs, or regular acrylic paint and a small brush for a more freehand look.
Seal each painted rock with a coat of clear acrylic spray or Mod Podge to protect the paint from weather and make the colors pop with a glossy finish. Scatter the finished rocks along a garden path, cluster them in a bowl on a patio table, line them along the front porch steps, or pile them in a glass vase as a red-white-and-blue display.
This is an ideal family craft — kids as young as three can paint rocks with big brushes and bold stripes, while older kids and adults can create detailed designs with fine-tipped paint pens. The rocks last for years outdoors and accumulate each summer as you add new designs to the collection. After several years of painting, you have a substantial collection of patriotic garden art that makes your yard uniquely yours.
Quick-Hit DIY Ideas (16-20)
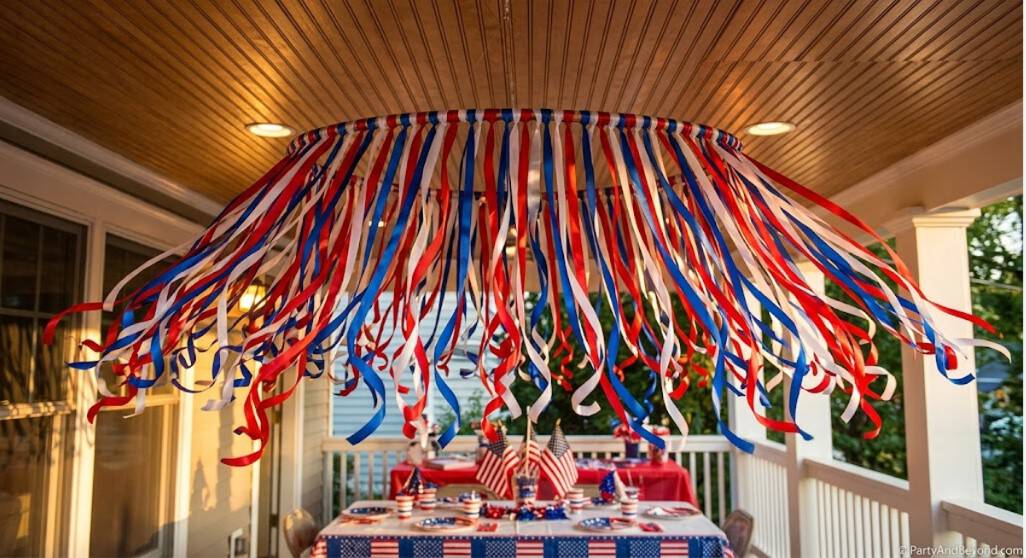
16. Patriotic Ribbon Chandelier
Tie 20 to 30 strips of red, white, and blue ribbon (curling ribbon works perfectly) to a hula hoop or embroidery hoop. Hang the hoop horizontally from a porch ceiling or tree branch. The ribbons dangle like a chandelier, swaying in the breeze and creating a dramatic overhead decoration for a dining area, dessert table, or party space. Total cost: $3 to $5. Time: 15 minutes.
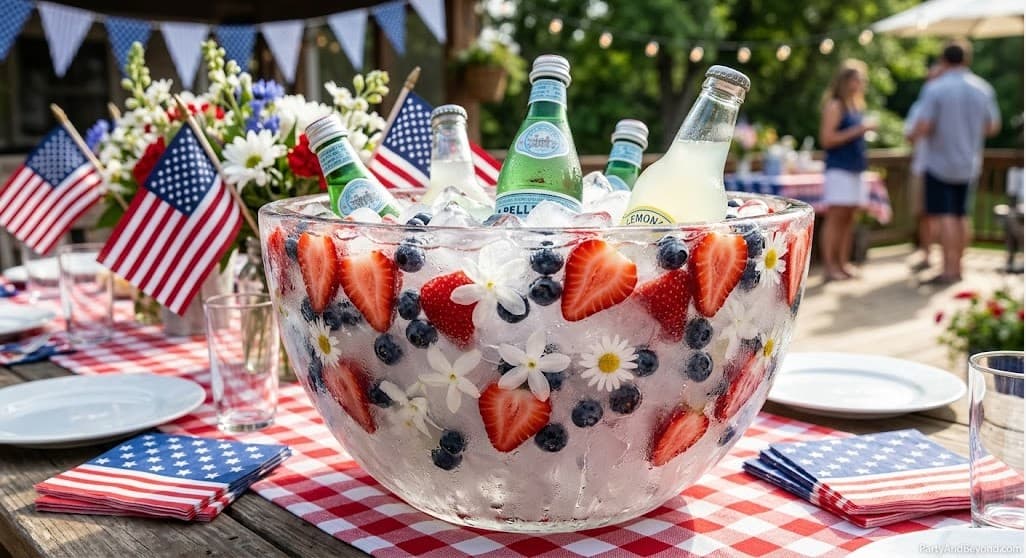
17. Frozen Berries Ice Bucket Centerpiece
Fill a large glass bowl or bucket with water, add fresh blueberries, strawberry slices, and white flower petals. Freeze overnight in the freezer (if it fits) or add ice to the bowl and embed the berries and petals in the ice as it melts and refreezes. Use the patriotic ice bowl as a stunning centerpiece or as a drink-chilling bowl for bottles and cans at a party. The red berries, blue berries, and white petals suspended in crystal-clear ice look like edible art. Cost: $5 to $8 in berries.
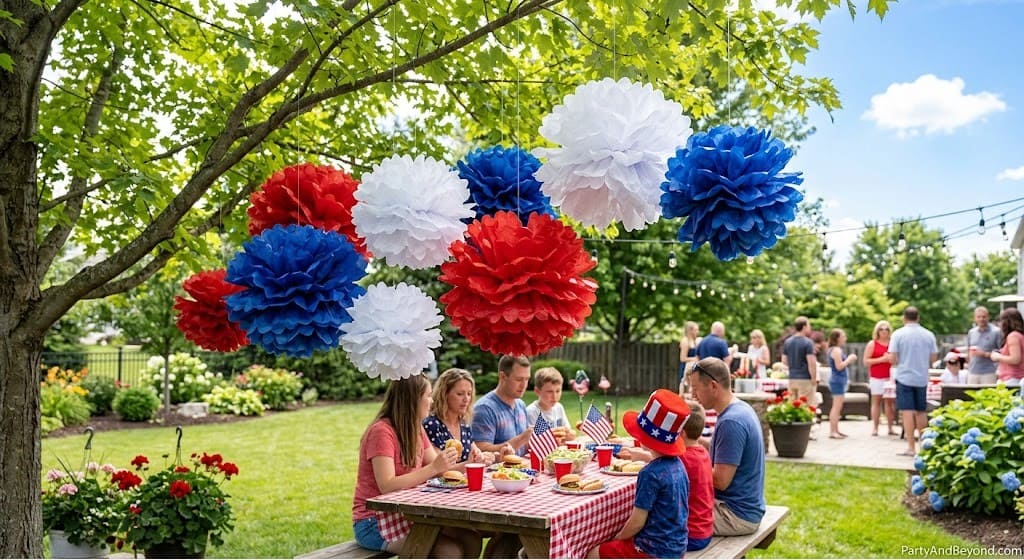
18. Tissue Paper Firework Pom-Poms
Make oversized tissue paper pom-poms in red, white, and blue using the standard accordion-fold technique (layer 8 sheets, fold accordion-style, tie the center, fan out the layers). Hang them from trees, porch ceilings, or string them on a line across the yard at various heights. The round, fluffy shapes resemble firework bursts frozen in mid-explosion — making them the perfect daytime stand-in for the real fireworks that come after dark. Five to seven pom-poms in mixed sizes and colors create a festive canopy over any outdoor party space. Cost: $2 to $3 for tissue paper. Time: 5 minutes per pom-pom.
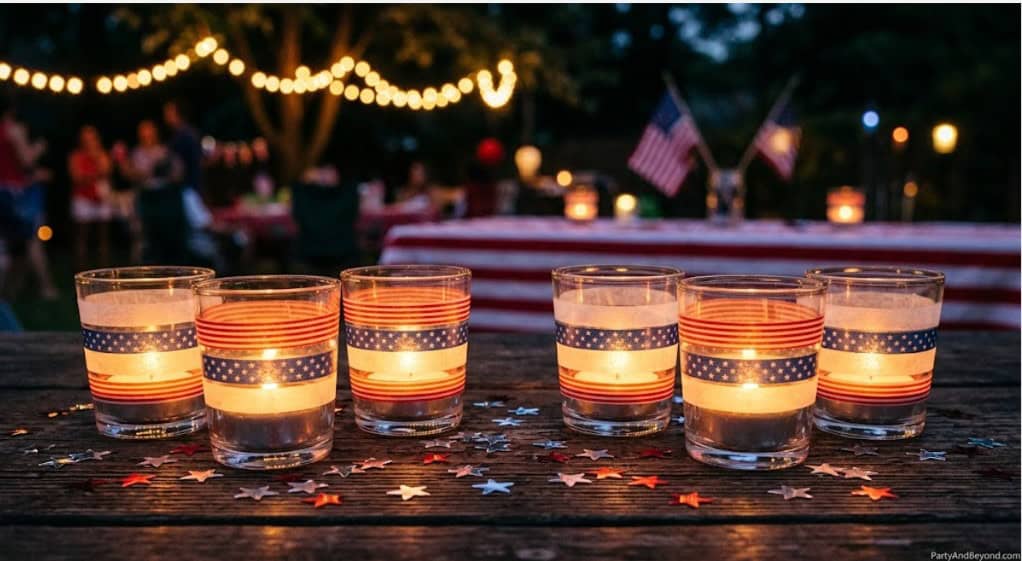
19. Patriotic Votives With Washi Tape
Wrap plain glass votive holders or small jars with red, white, and blue washi tape in horizontal stripes. The translucent quality of washi tape allows candlelight to glow through in patriotic colors when a tea light is placed inside. Make a set of six to eight and scatter them across surfaces throughout your party space — dining table, buffet table, porch railing, bathroom counter. Each one takes two minutes to make and costs approximately $0.50. The cumulative effect of ten glowing patriotic votives throughout a home creates a cohesive, immersive festive atmosphere.
20. Old Glory Jeans Pocket Wall Hanging
Cut the back pockets from old jeans (blue denim = built-in blue). Glue or stitch five to six pockets in a row onto a strip of red-and-white striped fabric or a painted wooden board. Each pocket holds a small flag, a sparkler, a flower stem, or a rolled napkin. Hang horizontally on a wall, fence, or porch. The combination of denim blue, red-and-white stripes, and functional pockets creates a unique Americana wall hanging that is part decoration, part storage, and entirely charming. Cost: $0 (old jeans) to $3 (fabric). Time: 30 minutes.
Frequently Asked Questions
What are the cheapest 4th of July decorations to DIY?
Mason jar luminaries ($0.75 each), paper plate wreaths ($0.50 each), painted tin cans ($0 from recycled cans), and tissue paper pom-poms ($0.30 each) are the cheapest DIY patriotic decorations. An entire porch display using these four crafts costs under $10 total and takes approximately one hour to complete. Dollar Tree is the best single-stop shop for all the supplies.
How far in advance should I make DIY 4th of July decorations?
Most DIY decorations can be made one to two weeks before July 4th and stored flat or in boxes until display day. Painted wood flags, rock paintings, and tin cans last indefinitely once sealed. Paper and tissue decorations should be made within a few days of use to avoid crushing or fading. Balloon garlands should be made the morning of the celebration.
What DIY decorations work best outdoors?
Painted wood flags, rock paintings, pinwheels, star lawn stakes, and sealed tin cans are the most weather-resistant outdoor DIY decorations. Tissue paper, paper plates, and book page crafts work outdoors in dry weather but should be brought inside or covered if rain is expected. Balloon garlands survive 12 to 18 hours outdoors in mild conditions.
Can kids help with these 4th of July crafts?
Absolutely — most of these projects are family-friendly. Firecracker toilet paper rolls (ages 3+), rock painting (ages 4+), star stamping on mason jars (ages 5+), pinwheel making (ages 6+), and bandana wreath assembly (ages 8+ with adult supervision for hot glue) all work well as family craft sessions. Assign age-appropriate tasks and let every child contribute to the final display.
How do I make my DIY decorations look professional?
Three principles: cohesive color palette (stick to red, white, blue, and one metallic accent like gold or silver), intentional grouping (cluster items in odd numbers — sets of three, five, or seven), and quality finishing (seal paint with clear coat, trim edges cleanly, use real ribbon instead of tape). These three habits elevate any handmade decoration from “craft project” to “home decor.”
Where should I display DIY 4th of July decorations?
Front porch (wreath, bunting, luminaries, flag), dining table (centerpiece jars, votives, confetti), buffet/food table (tin can utensil holders, balloon garland overhead), yard (star stakes, pinwheels, painted rocks), and mantel (book page banner, firecracker bundle, small flags). Distributing decorations across multiple locations creates an immersive patriotic atmosphere throughout your entire home rather than concentrating everything in one spot.
Every decoration on this list was made by a regular person with regular skills and a regular budget. No craft degree. No specialty tools. No Pinterest-perfect studio. Just scissors, paint, glue, and the desire to make the Fourth of July feel like it matters — because it does.
Pin your favorites, gather your supplies, and spend an afternoon creating decorations that will make your porch the most patriotic on the block. Your neighbor Karen has nothing on you now.
Happy Fourth. Go make something beautiful.
Visit PartyAndBeyond.com for more DIY party decoration ideas for every holiday and celebration.
Leah Meyer is a passionate event planner and creative writer behind Party & Beyond, where she helps hosts throw stunning celebrations on a real-world budget. From birthday parties and baby showers to backyard weddings and holiday gatherings, Leah personally tests every DIY idea she shares , proving that the wow factor lives in the details, not the price tag. When she's not planning the next party, you'll find her hunting for hidden treasures at dollar stores, inflating balloons (she owns three pumps!), or brainstorming with her dog, the official Chief Inspiration Officer of Party & Beyond.


")
")

")
")
")
")