
Disclosure: This post contains affiliate links. If you buy through them, I may earn a small commission at no extra cost to you. All recommendations come from personal use and research.
Quick Answer: A DIY photo booth for a party costs $15–$45 in materials and takes 30–60 minutes to set up. The three must-haves are a backdrop (balloon wall, sequin curtain, or flower wall), a prop basket (handmade or Dollar Tree finds), and decent lighting (window light or a $12 ring light clip-on). Professional photo booth rentals average $800–$1,200 per event — DIY delivers the same visual impact for 95% less.
How Do I Set Up a DIY Photo Booth at Home?
Here’s what actually works — a simple four-step process that applies to any backdrop you choose.
Step 1 — Pick Your Backdrop Style
Match your choice to two things: your timeline and your aesthetic. Quick options include a sequin curtain ($18–$28, 10 minutes) or streamer fringe curtain ($9–$13, 20–30 minutes). More involved builds include a balloon wall ($15–$27, 45–60 minutes) or faux flower wall ($25–$40, 2–3 hours). I always build photo booth backdrops the night before the party — even a 10-minute setup should be tested before guests arrive.
Step 2 — Gather Your Props
Aim for 12–18 props, mixing three categories: face props (glasses, mustaches, lips on sticks), sign props (speech bubbles, “Best Day Ever” boards), and wearable props (mini hats, crowns, boas). Dollar Tree covers most of these for under $15 total. The mistake most hosts make is buying too many — 40 props in a pile reads as chaos, not fun.
Step 3 — Set Up Lighting
Natural window light is free and produces better results than most artificial setups. Position your booth within 4–6 feet of a window (indirect, not direct sun) for daytime parties. For evening events, a ring light clip-on ($8–$12 on Amazon,) mounted to your phone creates even, flattering front-facing light. Avoid overhead-only ceiling lighting — it creates downward shadows that flatter nobody.
Step 4 — Choose Your Camera Setup
Your phone is completely fine. Set it on a small tabletop tripod ($8–$15,) positioned across from the backdrop. Put a sign next to the booth so guests know where to stand. Or designate one person as the unofficial photo booth photographer for the first 30 minutes to get things going. Once the first group of guests uses it, word spreads on its own.
12 DIY Photo Booth Ideas for Any Party
According to Pinterest Predicts 2026, photo booth and selfie station content saw over 180% year-over-year search growth on the platform — making this one of the fastest-growing party planning categories in 2026.
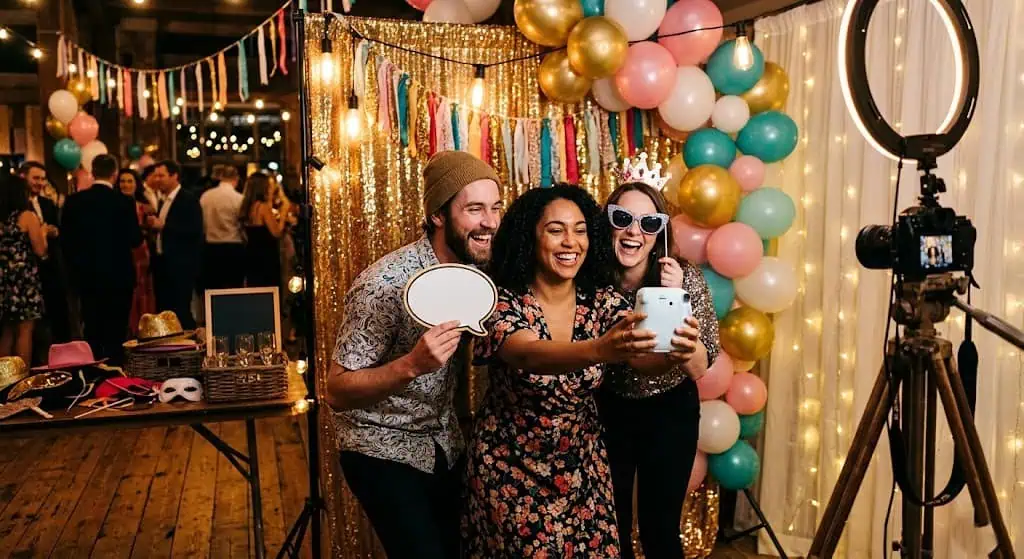
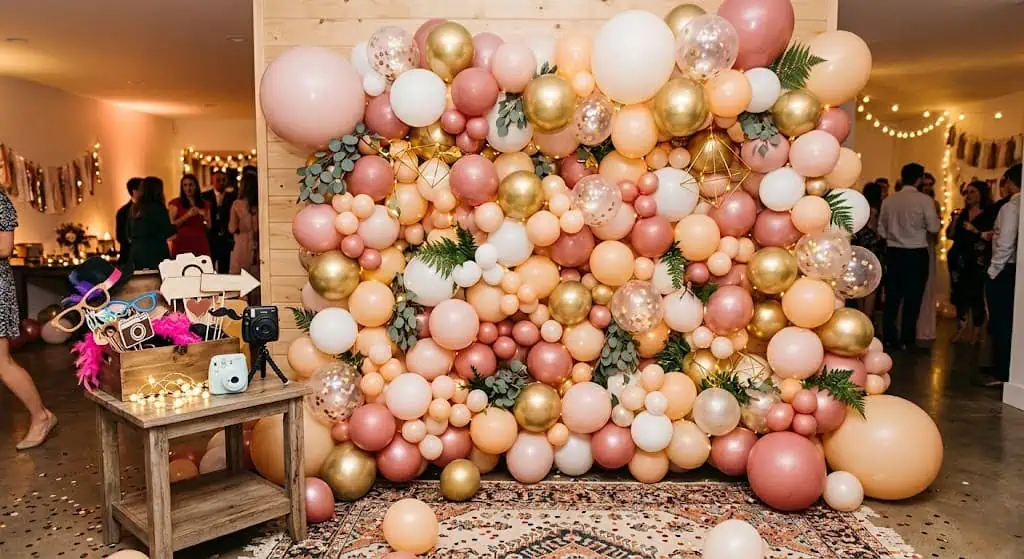
1. Balloon Wall Backdrop
Best for: Birthdays, baby showers, bridal showers | Budget: $15–$27 | Setup time: 45–60 min
This is the most versatile DIY photo booth backdrop on the list — and probably the one you’ve seen most on Pinterest. Done right, it looks like a professional event design piece. Done wrong (stiff, evenly-spaced rows of same-size balloons), it looks like a department store window.
The key is the organic arrangement. Vary the balloon sizes slightly — a mix of 5-inch and 11-inch balloons creates depth. Use three primary party colors plus one white or gold for balance. Thread inflated balloons through a decorating strip, fill gaps with glue dots, and mount on command hooks rated for the weight.
- 80–100 balloons in 3–4 coordinating colors — $8–$12 for a 100-count pack
- 1 balloon decorating strip, 6–8 feet — $3–$5
- Glue dots for gap-filling — $2–$3
- Hand pump — $8 if you don’t own one
I learned the balloon-wall lesson the hard way at my niece’s birthday last spring. I used the cheap tape-and-string method without a decorating strip and spent 40 minutes fixing fallen balloons the morning of the party. The strip method is non-negotiable. Forty-five minutes total and it holds all night.
💡 Pro Tip: Pre-inflate your balloons the evening before and store in a spare bathroom or bedroom overnight. They stay fully inflated for 24–48 hours. This saves 25+ minutes on party day.
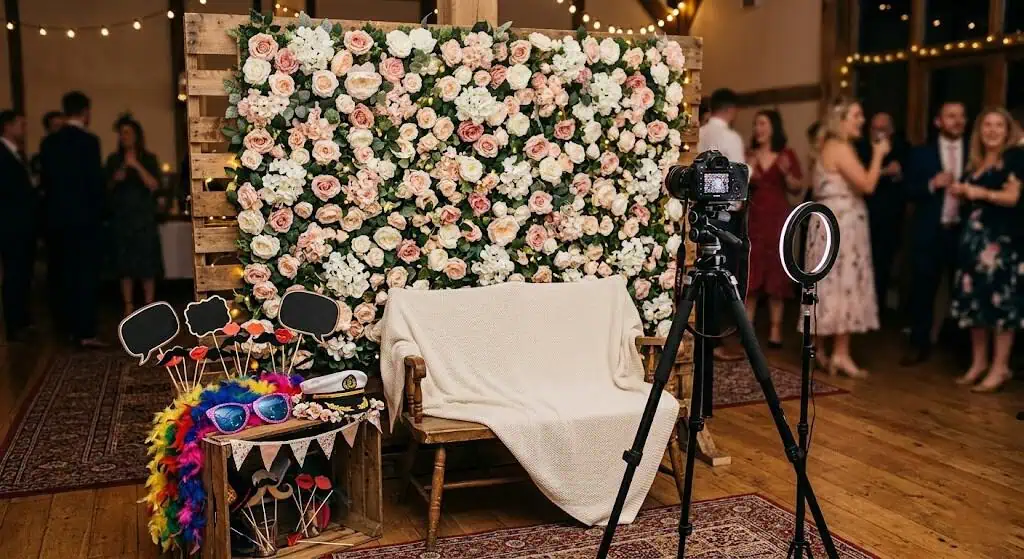
2. Faux Flower Wall
Best for: Baby showers, bridal showers, spring/garden parties, boho events | Budget: $25–$40 | Setup time: 2–3 hours
This is the one that makes people say “wait, you made this?” out loud. I’ve tested this at three parties now — two baby showers and one bridal shower — and every single time, guests assumed the host had hired a professional decorator.
Professional flower wall rentals run $200–$500. A DIY version using Dollar Tree and Hobby Lobby silk flowers looks essentially identical in photos for a fraction of that.
- Chicken wire or foam board panel (aim for 4 ft x 5 ft minimum) — $5–$10 at Home Depot
- 40–60 silk flowers in coordinating shades — $1.25 each at Dollar Tree
- Hot glue gun + bulk glue sticks (you’ll use more than you expect)
- Faux greenery sprigs to fill gaps — $1.25 per bunch at Dollar Tree
Attach flowers in clusters rather than individual placements: one large center bloom, two medium on either side, three small surrounding those. Fill gaps with greenery. The finished wall has that layered, lush quality that photographs like a professional installation.
Emma built one of these for her daughter’s first birthday last June using only Dollar Tree flowers. Sixty-two guests. The flower wall photo had 340 social media interactions. She spent $38.
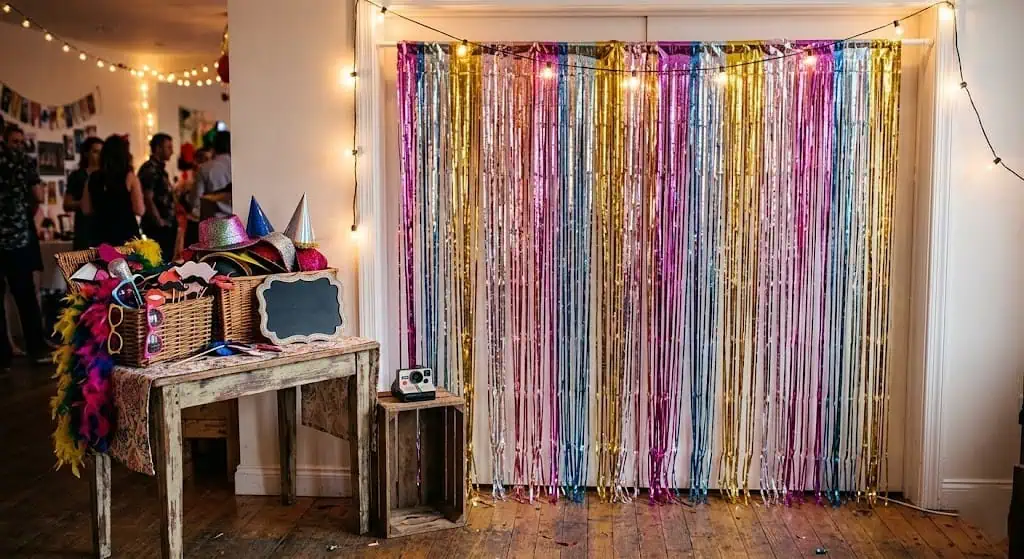
3. Streamer Fringe Curtain
Best for: Kids parties, birthday parties, last-minute setups | Budget: $9–$13 | Setup time: 20–30 min
Let’s be honest — this is the most underrated backdrop on this list, and I will stake my reputation on that opinion. It photographs with a layered, textural quality that looks far more expensive than $10 of crepe paper. It’s the setup hosts overlook, and the one I’ve started recommending first to anyone with limited time.
- 8–12 rolls of crepe paper streamers ($1 each at Dollar Tree)
- Command hooks
- Scissors
Cut streamers into 6–8 foot lengths and layer along the wall horizontally, overlapping edges slightly. For an ombre effect, arrange colors from light to dark. The layered fringe creates depth and movement in photos that belies the price tag entirely.
💡 Pro Tip: Choose an odd number of colors — 3 or 5 — for a more intentional, design-forward look. An even split of two colors tends to read as halved rather than layered.
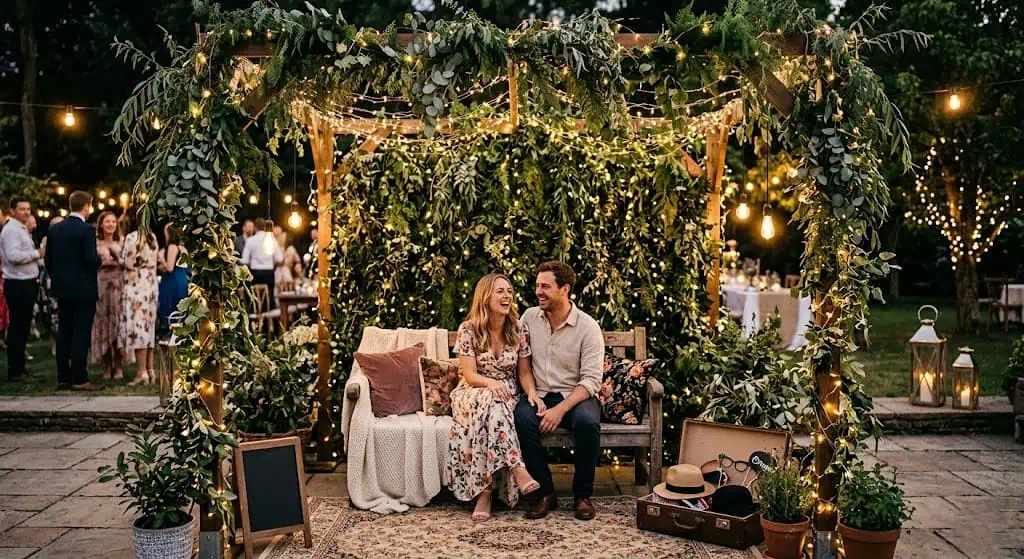
4. Greenery + Fairy Light Canopy
Best for: Boho parties, outdoor events, weddings, bridal showers | Budget: $27–$41 | Setup time: 45 min
My friend Emma uses this setup at almost every outdoor party she hosts, and watching guests’ reactions the first time they see it is one of my favorite things. Shoulders drop. Somebody inevitably says, “Oh, this is so pretty.” Then they immediately reach for their phone.
Warm string lights woven through faux eucalyptus garland — at dusk, this is the single most atmospheric photo booth backdrop you can build at home.
- 3–4 strands of faux eucalyptus garland — $1.25 each at Dollar Tree or $3–$5 each on Amazon
- Warm-white string lights, 20–50 feet — $10–$15
- Tension rod or PVC pipe frame — $5–$8
Layer the greenery over the rod so it cascades naturally. Weave lights through before hanging (much easier than after). Position a small bench or chair in front for seated photos.
The sweet spot for photographing this backdrop: the 30-minute window after sunset when the string lights glow but there’s still enough ambient light to capture faces clearly without flash.
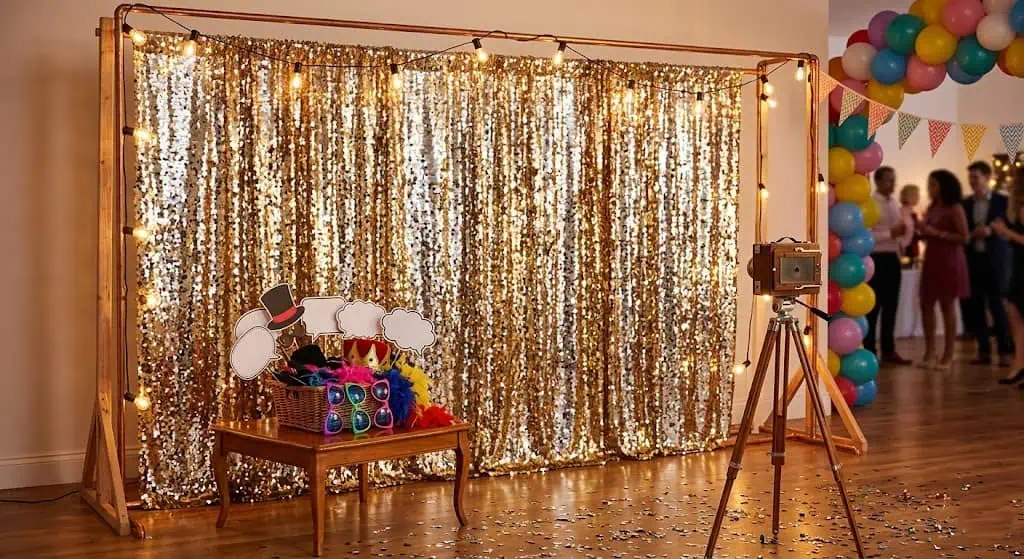
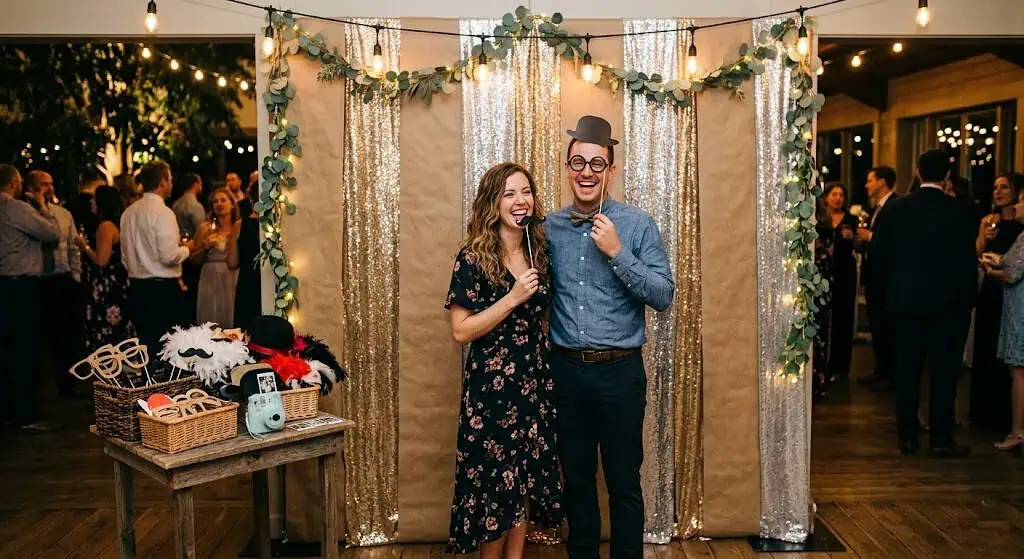
5. Sequin Curtain Wall
Best for: New Year’s, bachelorette, holiday parties, birthday glamour | Budget: $18–$28 | Setup time: 10 min
Here’s what actually works when you need maximum visual impact with minimal setup time: two or three rose gold sequin curtain panels over a tension rod. The curtains catch every light source in the room — flash photography, string lights, overhead — and create a shimmering, dynamic background that flatters every skin tone.
- 2–3 sequin curtain panels, 3 ft x 8 ft each — $7–$10 each on Amazon
- Tension rod to span your wall width
The mistake most hosts make is using only one panel. One panel has gaps that show the wall behind. You need 2–3 for a complete, dense backdrop. This is the lesson I learned the hard way at a bridal shower when I grabbed one curtain thinking it would be enough. It wasn’t. I re-ordered two more and used a different backdrop while they arrived. Budget for the full set from the start.
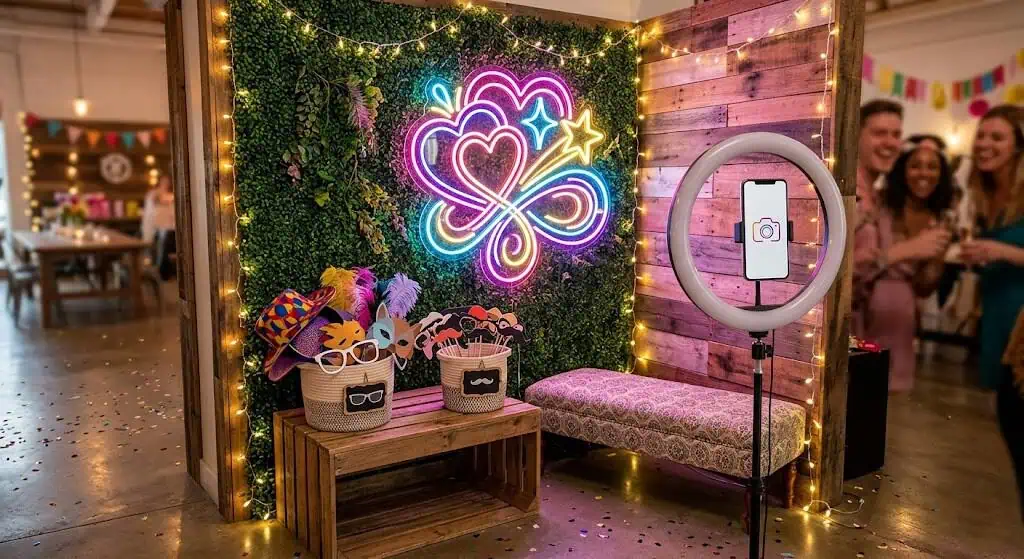
6. Neon Sign Selfie Corner
Best for: Adult parties, bachelorette, birthday, NYE, evening events | Budget: $23–$40 | Setup time: 10 min
One LED neon sign against a dark backdrop is the most instantly shareable photo setup you can build in 10 minutes flat. The glow provides its own photography-friendly lighting — no ring light needed. The aesthetic signals “this was planned,” even though it took you the length of one Netflix episode to set up.
- LED neon sign — search “party neon sign” or “birthday neon light” on Amazon — $20–$35 ; popular phrases: “Let’s Party,” “Birthday Girl,” “She Said Yes”
- Dark backdrop: black tablecloth ($3–$5), dark kraft paper roll, or navy/black fabric
Position this in a corner — two walls at 90° create a naturally contained space that frames every photo. The enclosure makes the neon glow more concentrated and dramatic.
💡 Pro Tip: Place a small floor plant or trailing vine near the base of your neon sign corner. The contrast of warm organic texture against the electric glow creates a layered look that photographs incredibly well.
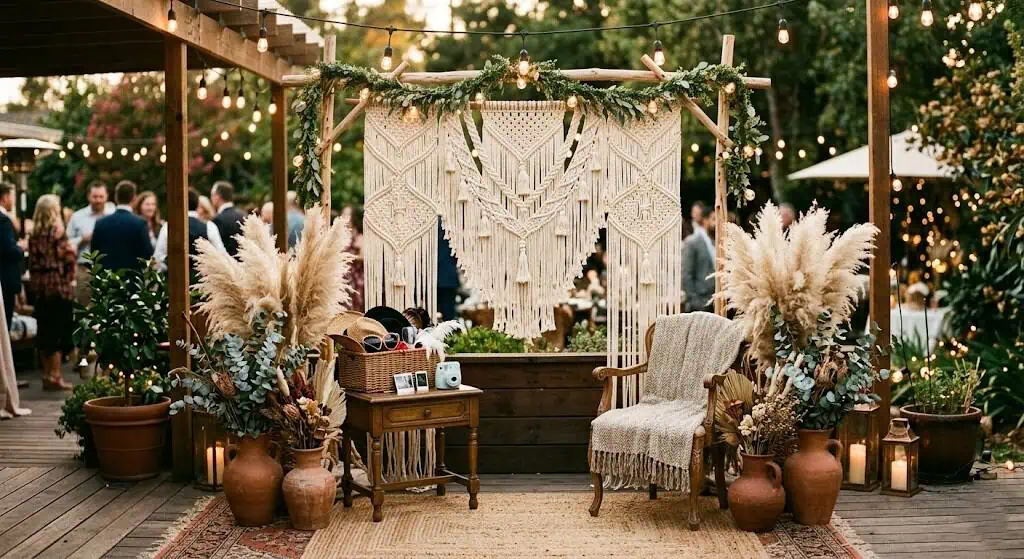
7. Boho Macramé + Pampas Grass Setup
Best for: Boho baby shower, bridal shower, garden party | Budget: $25–$45 | Setup time: 20–30 min
9 times out of 10, this is the setup that photographs so naturally that guests can’t tell it was intentionally constructed at all. Which is the whole point. The macramé and pampas read as “collected” — like you pulled objects you already own and arranged them beautifully. Nobody needs to know you ordered them all from Amazon last Tuesday.
- Macramé wall hanging — at least 24 inches wide — $15–$25
- Pampas grass bundle — real or faux (faux is more party-durable) — $10–$15
- Dried florals or neutral-toned stems — $5–$8 optional
Center the macramé as the focal point. Flank with pampas grass at varying heights — one tall, one shorter. Add dried florals around the base or woven through the macramé fringe. Position against a white or cream wall so the textures read clearly.
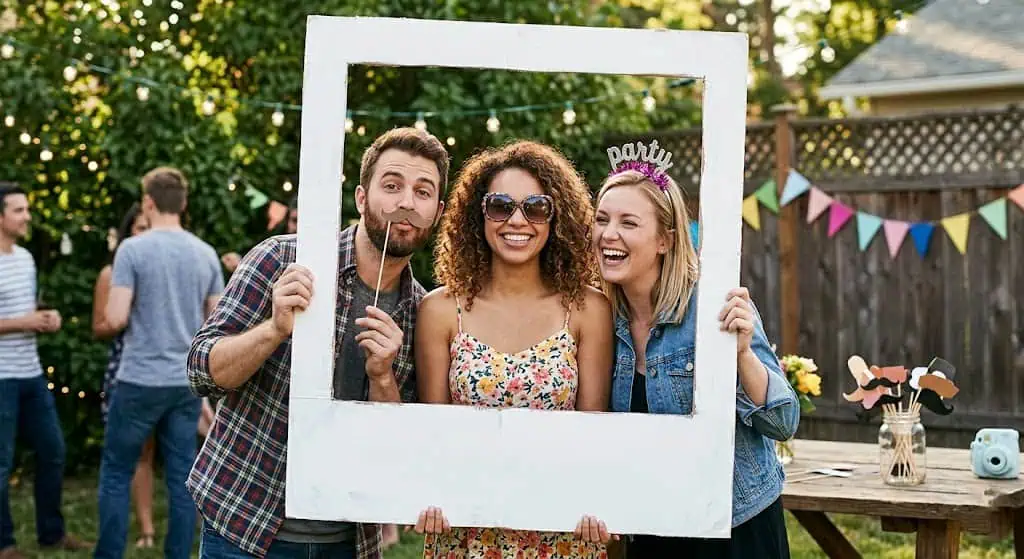
8. Giant Polaroid-Style Frame Prop
Best for: All party types, milestone celebrations, group shots | Budget: $7–$10 | Setup time: 45 min
This is the prop that never goes out of style. Adults love it. Kids love it. Every single party I’ve brought this to, there’s someone who picks it up and doesn’t put it down for the rest of the night.
- 2 sheets of large foam board — $2–$3 each at Dollar Tree
- Black paint or black cardstock for the polaroid border
- Box cutter to cut the viewing window
- Ribbon or dowel for a handle so guests can hold it at eye level
The photo-within-a-photo format is instantly recognizable and creates a consistent, fun shot format that every guest wants. One prop. All night. Zero maintenance.
9. Sequin + Kraft Paper Combo for Minimalists
Best for: Graduation, minimalist events, elegant dinner parties | Budget: $8–$20 | Setup time: 10–20 min
Not every party calls for maximalist energy. For graduation celebrations, elegant dinners, or events where the aesthetic is clean and intentional, a kraft paper roll backdrop does exactly what you need: a uniform, neutral background that makes people (and props) stand out.
- 48-inch wide kraft paper roll — $8–$12 on Amazon [; lasts for multiple events
- Bulldog clips or washi tape to mount
Pair this with a specific, edited prop collection — customized signs (“Class of 2026,” the graduate’s name) rather than a generic prop basket. The restraint is the design choice here.
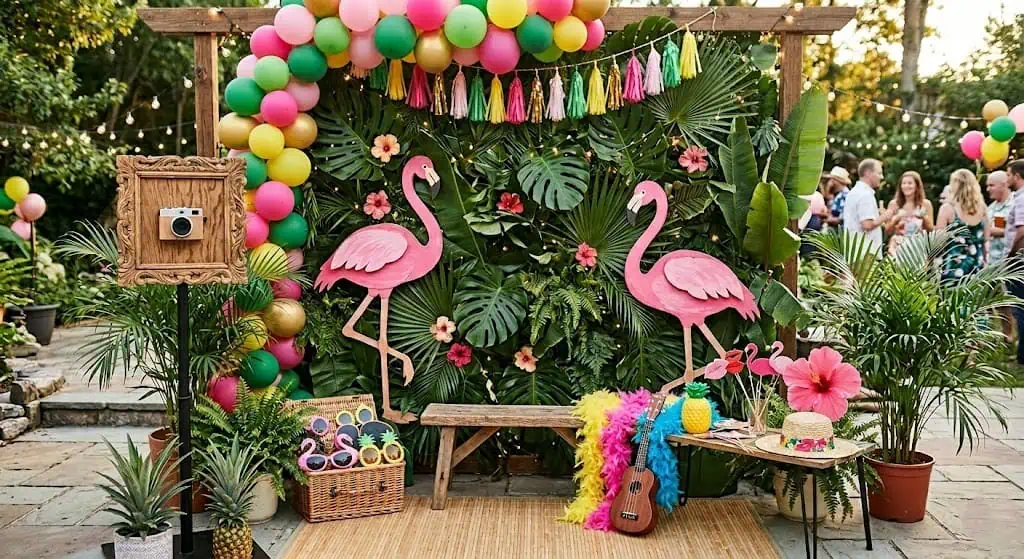
10. Tropical Leaf + Flamingo Wall
Best for: Luau, pool parties, summer birthdays | Budget: $11–$13 | Setup time: 30 min
Large paper palm leaves overlapping on a white wall, paper flamingo cutouts at varying heights, pops of hot pink and lime green — this creates an instant tropical energy that doesn’t require anything tropical in your actual backyard.
- Large paper palm leaves — $3–$4 at party supply stores or Amazon
- Paper flamingo cutouts — $4–$6
- Tape or pushpins
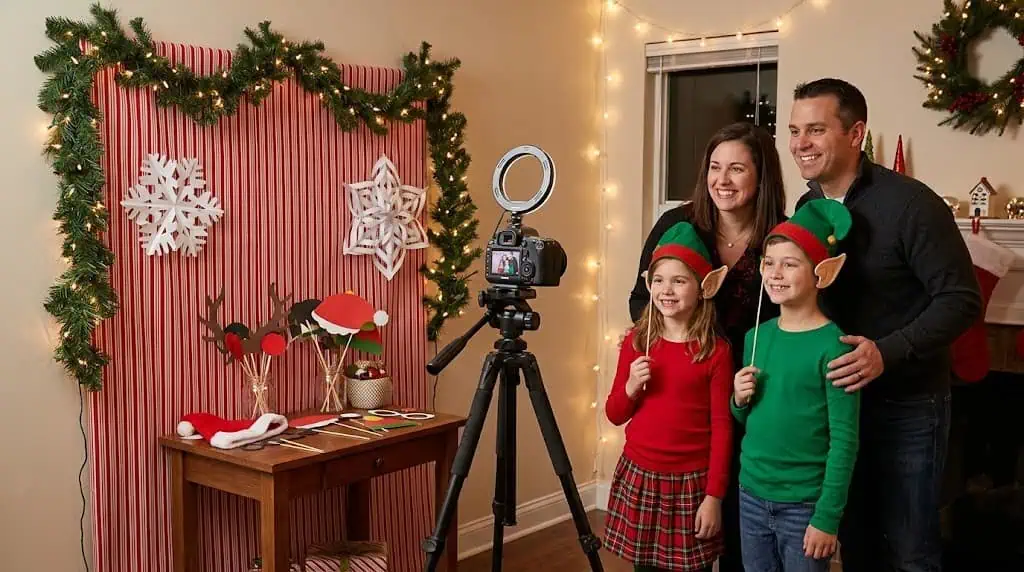
11. Holiday-Specific Themed Booth
Best for: Halloween, Christmas, Valentine’s Day, New Year’s | Budget: $15–$35 | Setup time: 30–45 min
For holiday parties, lean fully into the theme. The specific prop and backdrop combination should immediately communicate the holiday — which makes the photos more memorable and shareable.
Halloween: Black tablecloth backdrop + orange and purple balloon clusters + witch hats and spider web props in the basket Christmas: String lights backdrop + red ribbon bows + Santa hats and ugly sweater mini signs Valentine’s Day: Pink and red streamer fringe curtain + heart props + “Be Mine” speech bubble signs New Year’s: Sequin curtain + gold balloon letters spelling “2027” + tinsel wigs in the prop basket
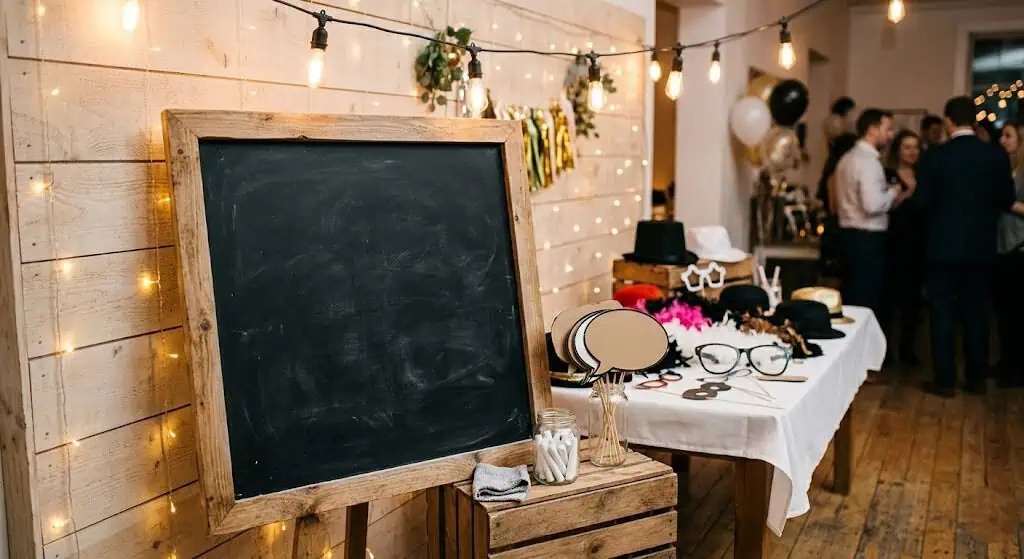
12. Chalkboard Sign Station
Best for: Rustic parties, graduation, vintage-themed events | Budget: $13–$20 | Setup time: 20 min
This is the quieter, more classic version of a photo station — one that would feel completely at home at a farmhouse wedding or rustic graduation celebration. A hand-lettered chalkboard with “Snap a Photo!” positioned near a curated prop bucket and a simple, neutral backdrop.
- Framed chalkboard — $8–$15 (Dollar Tree has seasonal options, or check Amazon
- Chalk markers for clean lettering — $4–$5 for a set
- 6–8 curated props in a galvanized bucket ($3–$5 at Dollar Tree)
Done right, this has a timeless quality that maximalist setups sometimes lack. Done wrong — with a messy background or too many competing elements — it reads as an afterthought. Keep everything within a tight visual frame.
What Are the Best DIY Photo Booth Props to Make at Home?
The best props photograph well, hold up all night, and make people laugh without requiring effort to use. Here’s what actually works:
Make at home (30 min total):
- Speech bubble signs: foam board, black marker, paint stir stick — write whatever’s relevant to your event
- Mustache-on-sticks: print free templates online, cut out, tape to a wooden dowel ($2–$3 for a pack)
- Personalized signs: “Birthday Squad,” “Class of 2026,” “She Said Yes” — cut from foam board and paint
- Oversized sunglasses: cardstock cutouts with a thick frame — more graphic, less realistic = more fun in photos
Dollar Tree prop haul (under $15 for the full basket):
- Mini top hats, tiaras, boas ($1.25 each)
- Glasses, mustaches, lips on sticks ($1.25 per pack, usually 4–6 pieces)
- Speech bubble chalkboard signs ($1.25–$2.50)
- Seasonal items aligned to your party theme
What to skip: The complete photo booth kit boxes on Amazon at $60–$80. I’ll be honest — they’re a waste of money. The backdrop is typically 5 ft x 7 ft (too small for groups), the props are flimsy and break within the first hour, and you get zero customization for your specific theme. You can build something three times better for half the price by shopping separately.
💡 Pro Tip: Edit the prop basket before guests arrive. 12–15 curated props look intentional and organized. 40 props in a pile look like a craft store clearance bin. Less is genuinely more here.
What Is the Best Selfie Station Lighting Setup for Home Parties?
Lighting is where most DIY photo booths fall apart quietly. Beautiful backdrop, great props, dark and grainy photos — because the light source is behind guests or only coming from directly overhead.
Option 1 — Natural Window Light (Free) Position the booth within 4–6 feet of a window. Indirect light (not direct sun streaming in) gives even, flattering illumination. This is the best free lighting option available and produces results comparable to professional setups. Best for daytime parties.
Option 2 — Ring Light Clip-On ($8–$12) — Clips directly onto your phone. Provides direct, even front-facing light for evening parties or darker rooms. Works best for 1–3 people in the shot.
Option 3 — Full Ring Light Stand ($25–$40) — For group photos where a clip-on doesn’t reach everyone. Position across from the backdrop at eye level, 4–6 feet back. The ring creates the signature catchlight reflection in eyes that makes phone photos look professional.
What NOT to do: Standard overhead ceiling lighting only. It creates downward shadows on faces — unflattering for everyone. If that’s your only option, add a floor lamp pointed forward toward the backdrop to add fill light from the front.
Common Mistakes to Avoid
The mistake most hosts make is building an elaborate backdrop and placing it in the darkest corner of the room. The second most common mistake? Not telling anyone it’s there. I’ve been to multiple parties where a genuinely beautiful photo booth existed in a side room or back corner, and fewer than 20% of guests ever found it.
- Don’t use regular tape on textured walls. It will fall mid-party. Command strips, rated for the backdrop weight, are non-negotiable. I’ve made this mistake more than once and I’m sharing it so you don’t have to.
- Don’t forget to frame the sides of your booth. What’s in the edges of the photo matters. A beautiful backdrop with someone’s coat rack visible to the left isn’t the photo anyone wants to post.
- Don’t skip the tripod. A phone propped against a wine bottle is not a selfie station. A $10 tabletop tripod is.
- Don’t overcrowd the prop basket. Edit it before guests arrive.
- Don’t place the booth where only one or two people can stand. Leave enough space for 3–5 people to gather comfortably.
- Don’t forget to promote it. Mention it when guests arrive, put a sign on it, or designate someone to kick off the first photo. After the first group uses it, it runs itself.
🎉 Quick Summary — DIY Photo Booth Ideas for Any Party
✅ Best for: Birthdays, baby showers, bridal showers, holiday parties, graduation, outdoor events 💰 Budget range: $9–$45 total ⏱ Setup time: 10 minutes (sequin curtain or neon corner) to 3 hours (faux flower wall) 🌟 Top pick: Sequin curtain wall — $18–$28, 10-minute setup, works for any occasion 📌 Don’t skip: A proper backdrop stand or command strips rated for weight — this is the thing that determines whether your setup survives the party 💡 Best budget option: Streamer fringe curtain — under $13, 20–30 minutes, photographs better than almost anything else on this list 🔧 Easiest build: Kraft paper roll background — $8–$12, 10–15 minutes, zero skill required
People Also Ask
Q: How much does a DIY photo booth cost for a party? Most DIY photo booth setups cost $15–$45 total. A streamer fringe curtain from Dollar Tree costs under $13. A sequin curtain wall runs $18–$28. A faux flower wall costs $25–$40. Compare to professional rentals, which average $800–$1,200 per 4-hour event according to The Knot (2025).
Q: What do you need for a homemade selfie station? The minimum: a backdrop (even a Dollar Tree tablecloth works), 10–15 props, and decent lighting. A window provides free, flattering light for daytime parties. For evening setups, a $12 ring light clip-on from Amazon solves the lighting problem completely.
Q: What is the best backdrop for a party photo booth? For speed and versatility: sequin curtain. For maximum wow at showers and boho events: faux flower wall. For the most underrated option that photographs above its price point: streamer fringe curtain at under $13. For outdoor parties: greenery and fairy light canopy.
Q: How do you set up a photo booth without spending a lot? Go to Dollar Tree first. Crepe paper streamers for the backdrop ($8–$10), props from the party section ($6–$8 for several items), and position near a window for free lighting. Total cost: under $20. Use a $8–$10 tabletop tripod from Amazon for a proper phone stand.
Q: What are the most popular photo booth themes in 2026? According to Pinterest Predicts 2026, the fastest-growing photo booth themes are boho (macramé + pampas), neon sign corners, and floral walls. Sequin curtain setups remain the most consistently popular for adult celebrations across birthday, bachelorette, and holiday party categories.
Frequently Asked Questions About DIY Photo Booth Ideas for Parties
Q: How do I make a DIY photo booth at home? Choose a backdrop style (balloon wall, sequin curtain, or streamer fringe), mount it using command strips or a backdrop stand, set up a prop basket with 12–15 items, and position near good lighting. Setup takes 15 minutes to 2 hours depending on complexity. No professional skills required.
Q: What do I need for a simple photo booth setup? The minimum requirement: a backdrop, a few props, and decent lighting. A Dollar Tree streamer curtain ($10), 5–6 props from the dollar bins ($6–$8), and natural window light ($0) creates a completely functional photo booth for under $20.
Q: What size should a photo booth backdrop be? Aim for a minimum of 6 feet wide and 7 feet tall for group shots of 3–5 people. Backdrops smaller than 5 ft x 5 ft show the wall around them in group photos, breaking the visual illusion. Most backdrop stand kits accommodate 5 ft x 7 ft to 8 ft x 10 ft panels.
Q: What are good photo booth props to make at home? Speech bubble signs (foam board + marker + stick), mustache cutouts (printed templates on cardstock, attached to wooden dowels), personalized signs for your specific event, and oversized cardstock sunglasses. These take 20–30 minutes to make total and photograph more memorably than generic store-bought kit props.
Q: Can you do a photo booth without a backdrop? Yes — use a feature wall that already exists in your home: a textured accent wall, a shelving unit styled with party elements, a large window dressed with curtains, or a doorway framed with balloons. The key is choosing a visually intentional background, not just any blank wall.
Q: What lighting is best for a home photo booth? Indirect natural window light is the best free option for daytime parties. For evening setups, a ring light clip-on ($8–$12, attaches to your phone) provides even front-facing light. A full ring light stand ($25–$40) works better for group shots. Avoid overhead-only ceiling lighting — it creates downward shadows that don’t flatter anyone.
Q: How do I make a photo booth that prints photos? Add a portable photo printer to your selfie station. The Instax Mini Link or Canon Selphy are the most popular options ($50–$90 for the printer). Guests take photos on their phones, connect via Bluetooth, and print instantly on the spot. Refill paper runs $8–$12 per 20 prints.
Q: What are photo booth ideas for outdoor parties? For outdoor setups: greenery and fairy light canopy (uses natural light beautifully), tropical leaf and flamingo wall, weighted balloon garland (use water-filled balloons at the base to anchor), or a free-standing macramé and pampas backdrop. Avoid sequin curtains outdoors — any breeze creates tangling issues.
Q: How long does it take to set up a photo booth? Fastest options: sequin curtain (10 minutes), neon sign corner (10 minutes), kraft paper roll (10–15 minutes). Mid-range: streamer fringe curtain (20–30 minutes), macramé and pampas setup (20–30 minutes). Longest: balloon wall (45–60 minutes), faux flower wall (2–3 hours). Build the backdrop the evening before to allow time for adjustments.
Q: How do I make photo booth props at home? Print free prop templates (search “free photo booth props printable” on Pinterest), cut them out of cardstock, and tape to wooden dowels or paint stir sticks from the hardware store. For custom signs, cut foam board to size and paint or use chalk markers. Total time for a full prop set: 30–45 minutes.
Q: What are the best photo booth ideas for a birthday party? For a birthday: balloon wall backdrop in the party’s color scheme with custom “Happy Birthday” speech bubble signs and a personalized number balloon (the guest of honor’s age) incorporated into the backdrop. For milestone birthdays (30th, 40th, 50th), a black and gold balloon mosaic with a sequin curtain creates a glamorous setup.
Q: What is a selfie station? A selfie station is a simplified photo booth designed for guests to photograph themselves (or with friends) without a designated photographer. It typically includes a backdrop, a few props in a basket, and a phone stand or tripod so guests can frame their own shots. The “selfie” format is more casual than a full photo booth experience.
Q: What photo booth backdrop colors photograph best? Lighter, saturated colors and high-contrast textures photograph best: sequin gold or rose gold, white or cream floral walls, pastel balloon clusters, and warm string lights on dark greenery. Avoid very dark solid-color backdrops in poorly lit rooms — guests photograph as silhouettes. Neutral backgrounds (kraft paper, white fabric) flatter every outfit.
Q: How do I prevent my photo booth backdrop from falling? Use command strips rated for the weight of your backdrop — check the package for the weight limit. For balloon walls, mount the decorating strip on multiple command strips spaced 18–24 inches apart. For heavy fabric or macramé, use a dedicated metal backdrop stand ($20–$30 on Amazon) — this is the most reliable solution for any backdrop type.
Q: Is a DIY photo booth better than renting one? For most home parties, yes. A DIY photo booth costs $15–$45 versus $800–$1,200 for a professional rental. The visual result in photos is comparable for backdrops like sequin curtains, flower walls, and balloon arrangements. Professional rentals add value for very large events (100+ guests), events requiring printed photo strips on the spot, or formal occasions where the host wants zero setup involvement.
Closing
Here’s what I’ve seen at party after party: the photo booth is rarely what hosts spend the most planning energy on, but it’s almost always what guests talk about the next day. The group texts, the tagged posts, the screenshot galleries — they all come from the 6 square feet of space you designated as the photo corner.
You don’t need to spend $1,000 on a rental. You don’t need professional crafting skills. A $13 streamer curtain, a basket of Dollar Tree props, and a window for natural light are all you actually need to build something guests will photograph all night.
Here’s what actually works: pick one backdrop from this list, build it the evening before so you can fix anything before guests arrive, put a small sign next to it, and then let it run itself. After the first group of guests discovers it, the line forms on its own.
The best party photos aren’t staged. They’re the ones where someone handed their friend a giant foam mustache at 8 p.m. and both of them started laughing before the photo was even taken. Your photo booth is just the excuse — the laughing, the gathering, the “okay, one more” — that’s the real thing.
Read More: Truth or Dare Questions for Adults: 100+ Clean and Spicy Ideas


